
You walk outside after a windy night and see shingles in the yard, a piece of flashing bent up near the gutter, and a water stain that wasn’t on the ceiling yesterday. At that moment, the question that often comes to mind is: do I call a roofer, call the carrier, or start taking photos?
The right answer is usually all three, but in the right order.
A wind damage roof insurance claim is rarely won by whoever talks the loudest. It’s won by whoever documents the loss clearly, protects the property quickly, and gives the adjuster a file that answers the usual objections before they turn into delays. That matters to homeowners who need their house dried in, and it matters just as much to desk adjusters, field adjusters, carriers, and TPAs who are trying to move a file to a fair resolution without unnecessary friction.
The claims that go smoothly usually have the same traits. Someone mitigated the damage fast. Someone preserved evidence before cleanup erased it. Someone distinguished storm-created damage from old deterioration. Someone tracked every conversation, every receipt, and every photo. When that happens, everyone spends less time arguing about what happened and more time solving the problem.
The High Stakes of Wind Damage in 2026
The typical wind claim doesn’t start with a dramatic disaster scene. It starts with ordinary confusion.
A homeowner notices three tabs in the flower bed. A contractor sees creasing on one slope but not another. A desk adjuster gets first notice of loss with two photos, no weather context, and a note that says “roof blew off.” Everyone knows wind can damage a roof. The dispute is usually about scope, cause, and timing.
That’s one reason these claims have become so consequential. In 2024, roof-related line items accounted for more than 25% of all residential insurance claim value in the United States, up from 17% in 2022, according to Martinez Hsu’s summary of Verisk roof claim data. When roof line items take that much of the claim value, minor mistakes at intake or inspection don’t stay minor for long.
Why ordinary wind losses get complicated fast
A wind loss can look simple from the ground and still be difficult in the file.
Wind doesn’t damage every roof the same way. It may break adhesive seals on one elevation, lift ridge components without obvious interior leakage, or compromise flashing before shingles start missing. On older roofs, the dispute gets sharper because one side may call it storm damage while the other calls it age, installation issues, or maintenance.
That’s why fast, careful fieldwork matters. A steep or tall roof especially shouldn’t be reduced to a quick glance from the driveway. If a property owner or adjuster is dealing with a complex structure, safe access and complete documentation become part of the claim itself, not just part of the repair conversation. Related protective equipment and field readiness often make the difference between a complete inspection and an incomplete one, especially on difficult structures, which is why practical gear like a protective device for 120 240 volt HVAC systems sits in the same broader category of loss mitigation thinking.
A roof claim gets expensive when the file lags behind the damage. Water enters. Evidence disappears. Opinions harden.
Who benefits from better documentation
Not just the homeowner.
- Homeowners need a fair decision and a dry house.
- Field adjusters need safe access and clear evidence.
- Desk adjusters need a file they can defend internally.
- Carriers and TPAs need cycle time under control.
- Contractors need an approved scope that matches what the building requires.
When people treat the claim as a fight from day one, they often create the very delays they fear. When they treat it like an evidence problem, they usually get farther, faster.
First Response Securing Your Property and Your Rights
The first hour after discovering wind damage is more critical than commonly understood. The goal is simple. Stay safe, stop further damage, and preserve evidence.
If there’s active leaking, exposed decking, loose metal, or debris hanging at the edge, don’t start with paperwork. Start with hazard control. People get hurt on damaged roofs because they rush to “see how bad it is.” Wet underlayment, lifted shingles, and unstable ladders turn a property claim into a medical problem in a hurry.
What to do before you call anyone
Walk the perimeter from the ground. Don’t climb the roof unless you’re trained, equipped, and the conditions are safe.
Use this order:
Check for immediate hazards
Look for downed lines, broken branches, sagging gutters, exposed nails, shattered skylights, and anything that could fall. If a tree is touching service lines or loading the roof structure, keep clear and call the appropriate emergency resource first.Document the untouched scene
Take wide shots before moving debris. Photograph each slope from multiple ground positions, the yard where shingles landed, dents to vents or flashing, and any interior staining. The first set of photos often becomes the cleanest proof of post-storm condition.Stop secondary damage
If rain is entering, arrange temporary protection. That may mean professional tarping, sealing an exposed penetration, or protecting contents inside with plastic and bins. Keep every receipt and note the time the mitigation happened.Notify the carrier promptly
Report the loss after the property is stable or while mitigation is being arranged. Give the facts you know. Date of discovery, storm date if known, visible damage, active leaking if present, and whether temporary repairs are underway.
Your duty to mitigate is real
Most policies require the insured to take reasonable steps to prevent additional loss. That doesn’t mean performing full repairs before inspection. It means acting responsibly.
What works:
- Hiring a qualified crew to tarp exposed areas
- Drying affected interiors
- Moving contents away from active leaks
- Saving invoices, photos, and packaging from temporary materials
What doesn’t work:
- Waiting days while water spreads
- Throwing damaged materials away before photographing them
- Letting an unqualified person perform a sloppy temporary fix that hides evidence
A small but important habit helps here: label and store loose fragments, fasteners, or detached shingle pieces in sealed bags with the collection date and location. Even basic field organization materials such as clear resealable storage supplies used for evidence control reflect the same principle. If you can preserve condition, you should.
What to say when you report the claim
Keep it factual and tight.
Say what you observed, not what you assume. “I found shingles in the yard and saw water staining on the bedroom ceiling after the wind event” is stronger than “the whole roof is destroyed.” Early overstatement hurts credibility later if the visible damage turns out to be more limited.
Practical rule: Report the loss early, but don’t guess. Facts travel better than theories.
This is a good point to prepare for the site visit. A simple walkthrough of first-response roof repair thinking can help frame what the carrier expects to see during mitigation and inspection:
Keep a same-day loss log
Start a note on your phone or in a notebook. Record:
- Date and time discovered
- Weather conditions when discovered
- Rooms affected inside
- Temporary actions taken
- Who you spoke with
- Claim number once assigned
This sounds basic. It isn’t. Claims often slow down because nobody can later pin down when the damage was first seen, when mitigation happened, or who approved what.
Building Your Claim File A Masterclass in Documentation
A strong claim file doesn’t rely on persuasion. It relies on organized proof.
Insurers often deny claims for “insufficient severity” or cosmetic issues, especially if damage falls below a subjective threshold such as 5-10% of the roof area, and Happy Roofing’s discussion of storm damage versus wear notes that meticulous photo and video evidence is the best defense. If you can quantify what the wind did, you reduce room for argument.
Think like you’re building an evidence locker

Good documentation has layers. Wide photos show context. Close-ups show mechanism. Video shows continuity. Records show timing. Estimates show scope.
Use a simple structure:
| Evidence type | What it proves | Common mistake |
|---|---|---|
| Wide exterior photos | Which slopes and components were affected | Only photographing one damaged spot |
| Close-up roof images | Creasing, lifted tabs, displaced shingles, damaged flashing | Shots too close to identify location |
| Interior photos | Resulting damage and spread pattern | Waiting until cleanup has begun |
| Video walkthrough | Sequence and relationship between damages | Fast panning with no narration |
| Maintenance records | Pre-loss condition and responsible ownership | Not gathering records until after denial |
| Weather support | Storm context tied to date of loss | Using vague storm references |
| Repair estimates | Scope and material requirements | Submitting rough verbal pricing |
The photos that actually help
Don’t just take “damage pictures.” Take inspection pictures.
A practical method is four wide directionals, then close-ups. Photograph each roof elevation from ground level if possible. Then capture each visible problem area with enough distance that the adjuster can tell where on the roof it sits. After that, move in for detail.
Use objects for scale when appropriate. A tape measure, chalk mark, or gloved hand can help show lifted shingle length or granule loss area. If you mark locations, use something visible and simple, such as ultra fine permanent markers that help label samples, bags, or diagram notes.
Photograph these components if present:
- Shingles or tiles with creases, tears, displacement, missing tabs, or broken corners
- Ridge and hip materials where wind often starts separation
- Flashing around chimneys, walls, valleys, and penetrations
- Vents and accessories that may show impact or displacement
- Gutters and downspouts where detached material may land
- Interior ceilings and attic areas if water entered
If a photo can’t answer “where is this, what am I looking at, and why does it matter,” it probably won’t help much.
Video is your continuity tool
A narrated walkthrough can be more useful than fifty random photos.
Stand back, identify the address, state the date, then walk the perimeter slowly. Point out the slope, the visible damage, and any debris pattern on the ground. If there’s interior damage, continue the video inside so the file shows exterior and interior conditions as one connected event.
Keep the narration factual:
- “North slope, two missing shingles visible from ground.”
- “Water staining in the hallway ceiling directly below this valley area.”
- “Temporary tarp installed after active leak was observed.”
Documents that strengthen the file
The best supporting file usually includes:
- Policy declarations page
- Any prior roof invoices
- Maintenance or inspection records
- Emergency mitigation receipts
- Contractor inspection notes
- Communication log with names and dates
- A written description of what was observed and when
If pre-storm photos exist, use them. If they don’t, don’t panic. Good post-loss documentation and a clean timeline still carry weight.
Navigating the Adjuster Inspection Preparing for Success
The adjuster inspection is not a formality. It’s the moment when the file starts turning into an official position.
Many property owners treat the visit too casually. They open the gate, point to the roof, and wait for the report. That’s a mistake. The inspection is your best chance to make sure the adjuster sees the full loss, understands the timeline, and leaves with evidence that matches what the property needs.
Don’t attend passively

Be present if you can. If you can’t, send a representative who knows the property and the damage history.
Have these items ready:
- Your claim number
- Date of loss and date discovered
- Photo set and video file
- Receipts for mitigation
- Contractor or inspection notes
- A written list of observed problem areas by slope or room
That last item helps more than people think. Adjusters inspect many roofs. If a property owner says, “there’s damage somewhere on the back,” that’s not useful. If they say, “rear right slope has missing shingles above the valley, ridge cap displacement, and water intrusion in the guest bedroom below,” the inspection starts on firmer ground.
What adjusters usually need to answer
Field adjusters generally need to reach a position on three things:
| Question | Why it matters | How you help answer it |
|---|---|---|
| Is there covered direct physical damage? | Determines whether the claim moves forward | Show visible storm-created conditions clearly |
| What caused it? | Separates wind damage from wear, installation defects, or age | Provide timeline, photos, and weather context |
| What scope is required? | Drives estimate, repairability, and supplement potential | Present all affected components, not just the leak point |
If the roof is steep, tall, fragile, or otherwise hard to access, that issue needs to be handled early. A rushed or limited inspection on a difficult roof often creates later disagreement because one party saw the whole structure and the other didn’t.
Professional presence changes the meeting
Trained field support can be decisive. A professional representative doesn’t need to argue. They need to make sure the roof is inspected safely and completely, and that every relevant condition is documented while everyone is on site.
That includes:
- Safe ladder placement and roof access
- Identification of all affected elevations
- Photo capture tied to exact roof areas
- Noting collateral issues such as flashing or accessory damage
- Flagging areas that may require supplemental review
Tools also matter. Clear imaging and organized visual records make discussions cleaner, whether those records come from a camera, drone where permitted, or field software. Even simple references to workflow standards such as professional photography and video documentation tools used in field reporting reflect a real point. The better the visuals, the fewer assumptions everyone has to make.
Don’t let the inspection become a scavenger hunt. A good site meeting is structured, calm, and specific.
Questions worth asking on site
Ask direct, non-argumentative questions:
- “Did you access every slope?”
- “Did you inspect ridge, valleys, and penetrations?”
- “Do you need any additional documents from me?”
- “Are you considering repairability, matching, or code-related concerns?”
Those questions do two things. They show you’re organized, and they create a record that these issues were raised early.
If the adjuster says they need more information, get that information fast. Delay after inspection is one of the most common ways a file loses momentum.
Decoding the Settlement Understanding Estimates and Repair Options
Once the estimate arrives, many people look only at the total. That’s the wrong place to start.
You need to read the settlement sheet line by line. A roof estimate can look polished and still miss critical components, understate steep-roof access needs, omit detach-and-reset items, or ignore code-triggered upgrades. The number at the bottom matters, but the path used to reach it matters more.
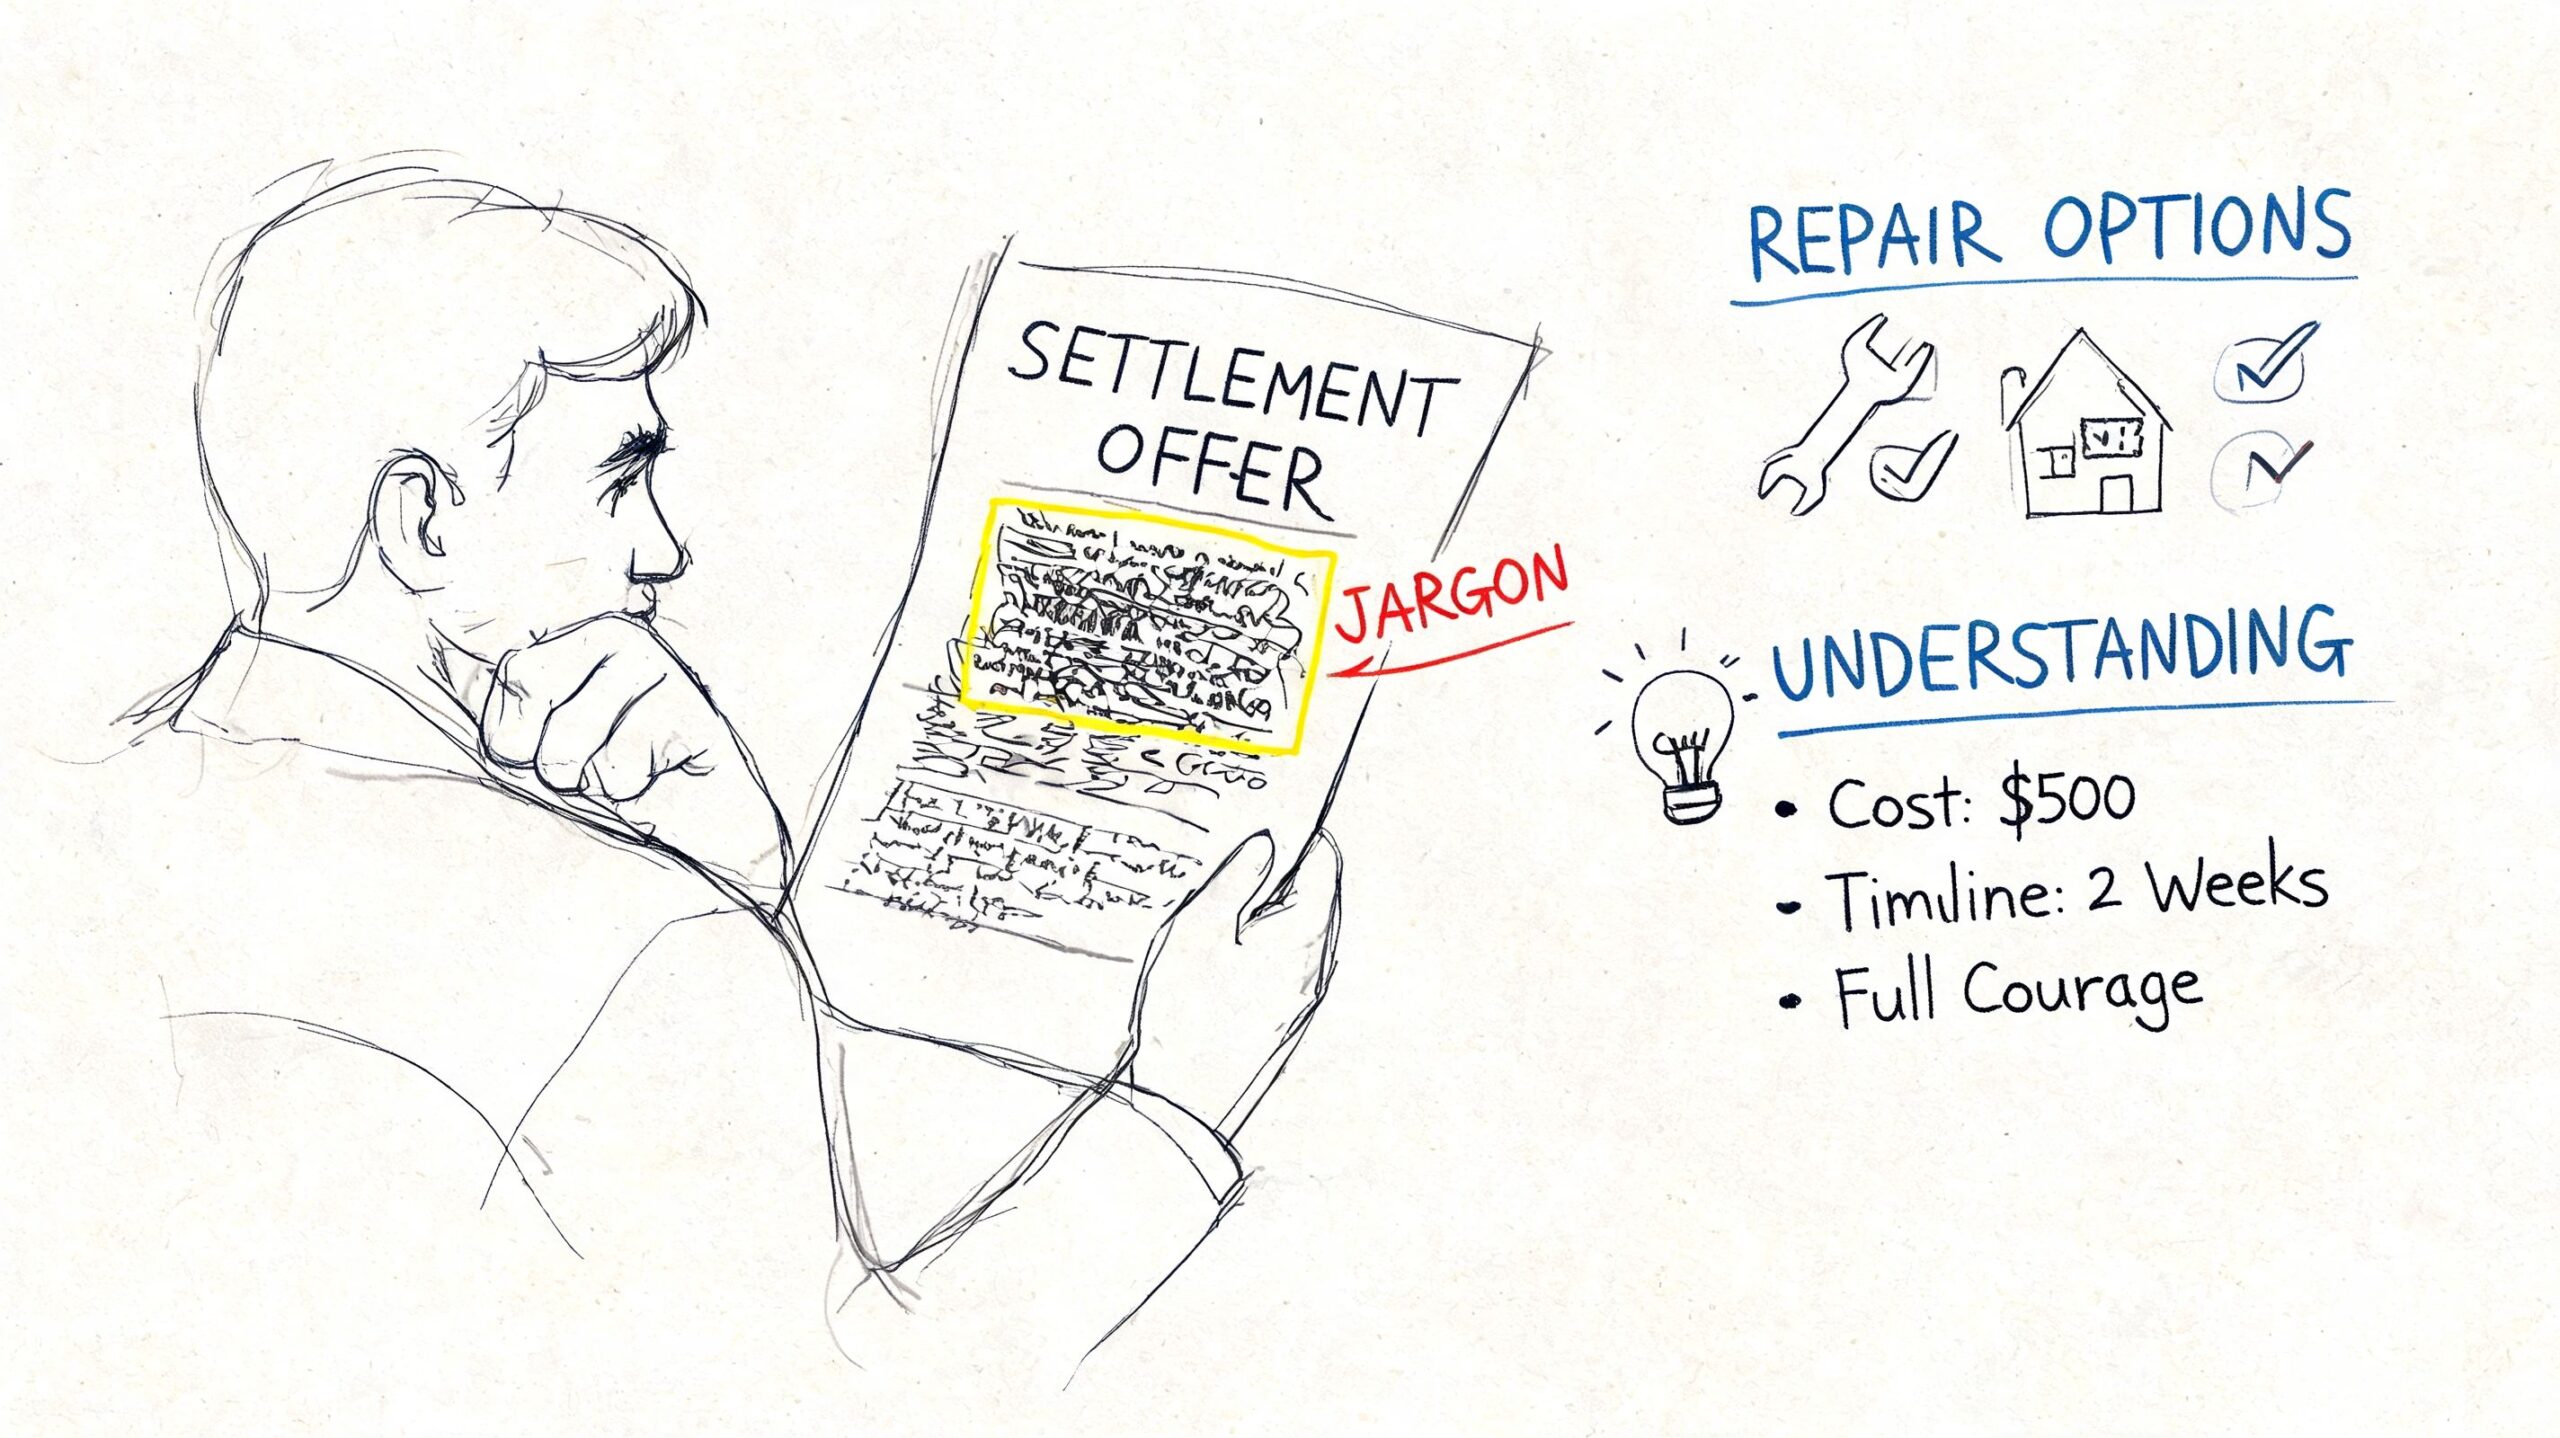
Read the scope before the dollars
Most estimates break down into labor, materials, waste, and line items for associated work. Don’t ask first, “Is this enough money?” Ask, “Does this scope describe the actual repair?”
Check for omissions such as:
- Ridge or hip materials
- Starter rows
- Flashing replacement
- Drip edge
- Ice and water barrier where required
- Detach and reset of accessories
- Steep or high charges if justified by access
- Interior line items when leakage occurred
A common problem is a narrow scope built around the most obvious visible damage. The estimate covers the missing shingles but not the components that must be disturbed and replaced to perform a proper repair.
ACV and RCV are not the same thing
If your policy pays Actual Cash Value (ACV) first and Replacement Cost Value (RCV) after work is completed, understand that you may receive less upfront than the approved repair total. The withheld amount is usually tied to depreciation and is often recoverable only after the repair is done and documented according to policy terms.
A simple way to understand it:
| Term | What it means in practice |
|---|---|
| ACV | The value after depreciation is applied |
| RCV | The cost to replace with like kind and quality, subject to policy terms |
| Depreciation | The amount withheld until conditions for recovery are met, if the policy allows |
If a homeowner thinks the first payment is the final payment, they may under-contract the work or assume the carrier is underpaying when the issue is how the policy pays in stages. On the other hand, if a carrier estimate subtly omits necessary scope, recovering depreciation later won’t fix an incomplete estimate.
Ordinance or Law can make or break the claim
Older homes and steep roofs frequently get into trouble.
Quality Roofing Systems explains that Ordinance or Law coverage is crucial because code-triggered upgrades can exceed $50,000, while standard caps are often only $10,000 to $25,000. If a wind loss triggers mandatory upgrades and nobody identifies them early, the gap between approved scope and actual compliance cost can become a major dispute.
This is not a technicality. If the local code requires upgraded underlayment, enhanced fastening, or other wind-load related work, those items aren’t optional just because the original estimate didn’t mention them.
Field insight: A cheap estimate usually becomes an expensive supplement when code enters the conversation late.
Repair versus replacement is not just a price debate
The main question is whether a repair returns the roof to a sound, functional, and compliant condition under the policy and applicable requirements.
Repair may be reasonable when the damage is genuinely isolated and matching materials are available. Replacement becomes the stronger position when repairability fails, code is triggered, or disturbing adjacent materials creates broader necessary work.
Before accepting a settlement:
- Compare the estimate to what the contractor says must be done
- Ask whether code upgrades were considered
- Confirm whether accessories and flashing are included
- Review whether the roof can be repaired without creating a patchwork problem
- Clarify what documents are required to recover any withheld depreciation
A settlement sheet is not a verdict. It’s an initial statement of what the carrier currently recognizes. If the scope is incomplete, challenge the scope with documentation, not anger.
Common Claim Pitfalls and How to Overcome Them
A denial or low offer doesn’t always mean the carrier is acting in bad faith. Sometimes the file is weak. Sometimes the inspection was incomplete. Sometimes the estimate ignored what the roof requires. And sometimes the initial position is wrong.
What matters is how you respond.
Public homeowners insurance data cited in a 2024 roof-claim discussion on YouTube reports that over 40% of roof insurance claims were closed with no payment, with many denials tied to alleged pre-existing deterioration on roofs aged 10-15 years. That should tell you two things. First, denials are common. Second, the “wear and tear” argument is not rare, especially on aging roofs.
Pitfall one: the wear and tear denial
This is the classic objection. The carrier acknowledges the roof is old and says age, brittleness, or deterioration caused the condition. Sometimes that’s true. Sometimes it’s an easy explanation applied too broadly.
The way through it is not emotion. It’s separation of conditions.
Build a response that distinguishes:
- pre-existing aging,
- maintenance history,
- and storm-created change.
Useful evidence includes date-stamped post-storm photos, prior maintenance records, photographs showing fresh displacement or creasing, and any proof of condition before the event. If you can show a roof was aged but serviceable before the wind event and then visibly altered after, the file becomes harder to dismiss as ordinary deterioration.
Pitfall two: the cosmetic label
Some carriers or inspectors classify visible damage as cosmetic or below actionable severity. That issue often appears when there are lifted shingles, broken seals, or limited visible displacement but no dramatic interior leak.
Your response has to focus on function, not appearance.
Ask these questions:
- Does the lifted material still seal as designed?
- Has the wind compromised water-shedding performance?
- Will the repair require disturbing adjacent materials?
- Did the damage shorten service life or create leak susceptibility?
A roof doesn’t need to be catastrophic to be compromised.
If the system won’t perform as intended after the storm, “cosmetic” may be the wrong label.
Pitfall three: patch approval on a roof that needs more
Partial repair approvals can be appropriate. They can also be shortsighted.
If a patch won’t restore uniform function, can’t be integrated correctly with existing materials, or leaves code and matching issues unresolved, then a small repair line item may solve the estimate without solving the roof. That’s where a detailed contractor scope, photos, and written explanation become essential.
Organize physical samples, damaged fragments, and labeled notes carefully. Even basic field evidence control habits, supported by something as simple as resealable documentation bags for storing roof fragments and labeled samples, can help keep a supplement package clean and credible.
Pitfall four: treating the first answer as the last answer
You usually have options.
| Problem | Better response |
|---|---|
| Incomplete inspection | Request re-inspection and identify missed areas specifically |
| Low scope | Submit contractor estimate with photo support and itemized differences |
| Wear and tear denial | Provide timeline, maintenance records, and storm-specific damage evidence |
| Code omission | Request review of applicable code items and supporting documentation |
| No movement after discussion | Use the carrier’s formal review, supplement, or appeal process |
If communication stalls, stay formal and concise. Send a written summary of the disputed items. Attach exhibits. Reference dates. Ask for a written response.
What actually works
The strongest challenge packages usually have these traits:
- They isolate disputed issues one by one
- They attach photos to each issue
- They explain why the existing estimate is incomplete
- They include invoices or estimates for mitigation and repair
- They avoid broad accusations and stick to documented facts
What doesn’t work is sending a long angry email that says the carrier is “trying to get out of paying” without tying that complaint to specific evidence.
If the dispute remains unresolved, review your policy language and procedural options. Depending on the circumstances, that may mean re-inspection, appraisal, expert evaluation, or legal review. The important point is this: a weak first decision can often be improved when the follow-up is organized.
Frequently Asked Questions About Wind Damage Claims
Some questions come up on almost every file. Here are the short answers people require.
| Question | Answer |
|---|---|
| Should I call the insurance company before I tarp the roof? | If water is entering, protect the property first or arrange help immediately. Document conditions before and during mitigation, then report the claim promptly. |
| Do I need to get on the roof myself? | No. In many cases you shouldn’t. Ground photos, interior photos, and professional inspection are safer and usually more useful than a risky self-inspection. |
| What if the adjuster says the damage is old? | Ask for the specific basis for that conclusion, then respond with date-stamped storm documentation, maintenance records, and inspection evidence that separates storm-created damage from pre-existing conditions. |
| Can I challenge a repair-only estimate? | Yes, if the repair scope is incomplete, not functionally sound, or ignores code and related components. Challenge the scope with itemized evidence. |
| Do temporary repair receipts matter? | Yes. They support your mitigation efforts and help explain what was done to prevent further loss. |
| What if I disagree with the settlement? | Don’t rely on a phone call alone. Send a written, documented response identifying the disputed items and what support you’re providing for review. |
| Is a professional inspection worth it? | On steep, tall, or complex roofs, or where cause is disputed, professional documentation often makes the file clearer for everyone involved. |
When a wind damage roof insurance claim involves a steep roof, a tall structure, active leaking, or a disputed scope, fast and reliable field documentation matters. Fox Claims Consultants LLC provides nationwide property inspection support, including steep and tall roof inspections, ladder assist, storm damage assessments, emergency tarping, temporary repairs, and detailed photo reporting that helps homeowners, adjusters, carriers, and contractors move claims forward efficiently.
Leave a Reply