
A storm has just moved through. The phone starts ringing. A homeowner reports water on a bedroom ceiling. An adjuster needs roof access on a steep two-story structure. A carrier wants clear causation, clean documentation, and no avoidable liability attached to the inspection.
That is the moment when “roof inspection services near me” stops being a casual search and becomes a risk-management decision.
The problem is simple. Many local results are built around free estimates and repair sales. That can work for a straightforward maintenance call. It does not work well when the roof is steep, tall, storm-damaged, or already leaking into occupied space. In those cases, the inspection has to do more than spot visible damage. It has to document the condition thoroughly, protect everyone on site, and produce a report an adjuster can use.
A professional roof inspection is not a set of photos from the eaves. It is a controlled process. It starts with safe access, moves through a disciplined inspection sequence, and ends with findings that hold up under claim review. For carriers, desk adjusters, field adjusters, TPAs, and storm-impacted owners, that difference matters. It affects whether the claim moves cleanly or stalls over missing information.
Why a Professional Roof Inspection Matters After the Storm
The first hours after a storm are noisy. Branches are down. Gutters are full. Shingles may be in the yard, but the significant damage is often less obvious. Water can enter at flashing, ridge transitions, pipe boots, or impact points and travel before it appears inside.
That is why a quick walk-around rarely answers the core question. The issue is not only whether the roof was hit. The issue is what failed, where the water entered, what conditions predated the storm, and what needs immediate mitigation.
What the adjuster needs right away
An adjuster does not need guesses. The file needs a chain of facts.
That means identifying whether damage patterns point to wind uplift, debris impact, flashing failure, aging materials, or a combination. It also means separating functional damage from worn but still serviceable components. On a high-risk roof, even reaching those areas safely may require specialized access methods instead of a standard ladder set.
When the inspection is handled correctly, the job site calms down. The owner gets a clear explanation. The adjuster gets usable documentation. The carrier gets a defensible basis for next steps.
A storm inspection should stabilize the claim, not widen the dispute. If the first site visit misses hidden moisture, secondary entry points, or unsafe access issues, everyone loses time.
Why generic inspections fall short
Many “free inspection” offers are built to answer one question: can this contractor sell the replacement? That is not the same as evaluating a loss.
A claim-focused inspection looks deeper. It tracks interior signs of intrusion, attic conditions, perimeter details, accessory penetrations, roof-surface damage, and temporary protection needs. It also accounts for the practical reality that steep and tall roofs demand different safety planning than a low-slope walkable roof over a garage.
When that discipline is missing, the inspection can create more confusion than clarity. The photos are incomplete. The roof plan is vague. The report does not connect observed damage to likely cause. Reinspection becomes likely, and so does delay.
The Critical Difference Between Free Estimates and Expert Assessments
Search “roof inspection services near me” and most results sound similar. Free inspection. Fast quote. Same-day visit. Those offers appeal to owners under stress, but they often leave adjusters with an incomplete file.
A free estimate is usually designed to generate repair work. An expert assessment is designed to document conditions accurately, especially when the structure itself raises safety concerns.
Where local search results often miss the point
An underserved issue in local search results is the lack of emphasis on steep and tall roof risk. Major providers often promote standard checks but fail to address high-risk structures, including roofs steeper than 6:12, where ordinary roofing crews may decline access. Roofing is also the most dangerous construction trade, and 80% of fatalities come from falls according to the BLS 2024 report cited in this discussion of Houston roof inspection listings at Thumbtack.
For carriers and adjusters, that gap matters. The same source notes that certified inspectors using ladder assist and safety protocols can reduce liability by 30-50% through precise documentation.
What a professional assessment includes
A thorough assessment starts before anyone climbs. The inspector evaluates pitch, height, surface condition, landing zones, debris, weather exposure, and whether direct foot traffic is appropriate. On some structures, drones or remote imaging should support the inspection. On others, ladder assist and controlled roof access are still necessary.
The difference shows up in the file:
- Sales estimate mindset: Limited photos, broad repair language, little attention to access risk.
- Claim documentation mindset: Condition mapping, penetration detail, elevation-specific notes, interior correlation, and clear safety rationale.
A simple tool such as a wind speed meter with LCD temp is a good example of the mindset difference. In a sales visit, tools like that may never come out. In a professional inspection, site conditions and exposure matter because they affect safe access and the reliability of observations.
Red flags adjusters should catch quickly
If an inspection provider cannot explain how they handle steep slopes, tall elevations, or post-storm access restrictions, that is a warning sign.
Use this quick screening test:
- Ask about slope thresholds: If they cannot describe how they approach roofs over 6:12, they may not be the right fit.
- Ask who documents causation: If the answer is “we take pictures,” expect gaps.
- Ask how they protect the file: The right provider can explain what they capture, why they capture it, and how it supports claim review.
- Ask about temporary mitigation: If they inspect damage but cannot address urgent exposure, secondary loss may continue while the file sits open.
Free can be expensive when the first inspection is incomplete. Reinspection, disagreement, and preventable interior damage cost more than doing the first visit correctly.
Inspecting High-Risk Roofs Storm Damage and Steep Slopes
A high-risk roof changes the inspection plan. You do not inspect a steep, storm-damaged roof the same way you inspect an accessible one-story roof with visible age-related wear. Access, documentation, and defect interpretation all get more technical.
What gets checked on storm-damaged steep roofs
On post-storm steep-slope inspections, one of the first technical checks is shingle uplift resistance, especially on roofs in 110-130 mph wind zones. Flashing and penetration details also matter. Compromised boots account for 60% of leak penetrations during high-wind events, and certified inspectors use drones and infrared scanning to identify moisture intrusion beneath the deck, as summarized in this overview of storm-focused roof inspection practice from Orlando Roof Tech.
That same source notes that roofs aged 15-20 years have 35% higher failure rates in severe weather.
Those figures matter because visible roof-surface damage is only part of the loss. A steep roof can shed debris and still hold hidden moisture below the shingle line or at penetrations. If the inspection stays on the surface only, the report may miss the reason the owner is seeing water indoors.
Functional damage versus cosmetic wear
Adjusters constantly deal with this distinction. A professional inspection should help resolve it, not blur it.
Functional damage affects the roof system’s ability to shed water or resist weather. Cosmetic wear may affect appearance without changing current performance. On storm claims, the inspector should identify:
- Wind-related indicators: lifted tabs, broken seal strips, displaced shingles, ridge disturbance, and edge damage
- Impact-related indicators: fractures, bruising, dents consistent with storm direction, and collateral signs on soft metals
- Leak-path indicators: failed flashing, split boots, open transitions, or displaced accessories
- Age or maintenance indicators: generalized wear, uniform granule loss patterns, prior repairs, and deferred upkeep
The key is correlation. A single cracked shingle on an older roof is not interpreted the same way as repeated directional damage after a wind event with matching accessory distress.
Why access method changes the result
Steep and tall roofs force trade-offs. Walking every surface may be unsafe or may damage brittle materials. Staying entirely on the ground may miss critical evidence. Good inspectors choose the method that produces reliable information without creating additional loss.
Typical options include:
| Access method | Best use | Limitation |
|—|—|
| Ground and perimeter review | Initial hazard scan, debris field, elevation overview | Limited visibility at upper details |
| Drone imaging | Tall structures, fragile surfaces, overview mapping | Cannot replace all hands-on checks |
| Ladder assist | Controlled access to key slopes and details | Requires training and strict setup discipline |
| Infrared scanning | Hidden moisture detection beneath surface materials | Works best when paired with physical observations |
For slopes greater than 6:12, immediate ladder-assist evaluation is one of the actionable steps identified in the source above. Detailed estimating with Xactimate can also help accelerate approvals by documenting causation in a format carriers can review.
On a steep roof, the safest inspection is not always the shortest one. It is the one that matches the roof’s pitch, height, damage pattern, and surface condition.
What does not work
Three habits create bad claim files on high-risk roofs:
Assuming visible damage tells the whole story
Leaks often start at transitions and penetrations, not in the middle of an obvious shingle field.Treating all old roofs as storm losses or all old roofs as wear
Age matters, but it does not erase storm-created functional damage.Using one access method for every structure
A steep two-story roof with storm debris needs a different approach than a low-pitch ranch home. In such cases, a national inspection partner may be used as one option among others. Fox Claims Consultants LLC performs steep roof access, ladder assist, storm and tree damage assessment, temporary mitigation coordination, and claim-focused documentation for difficult properties.
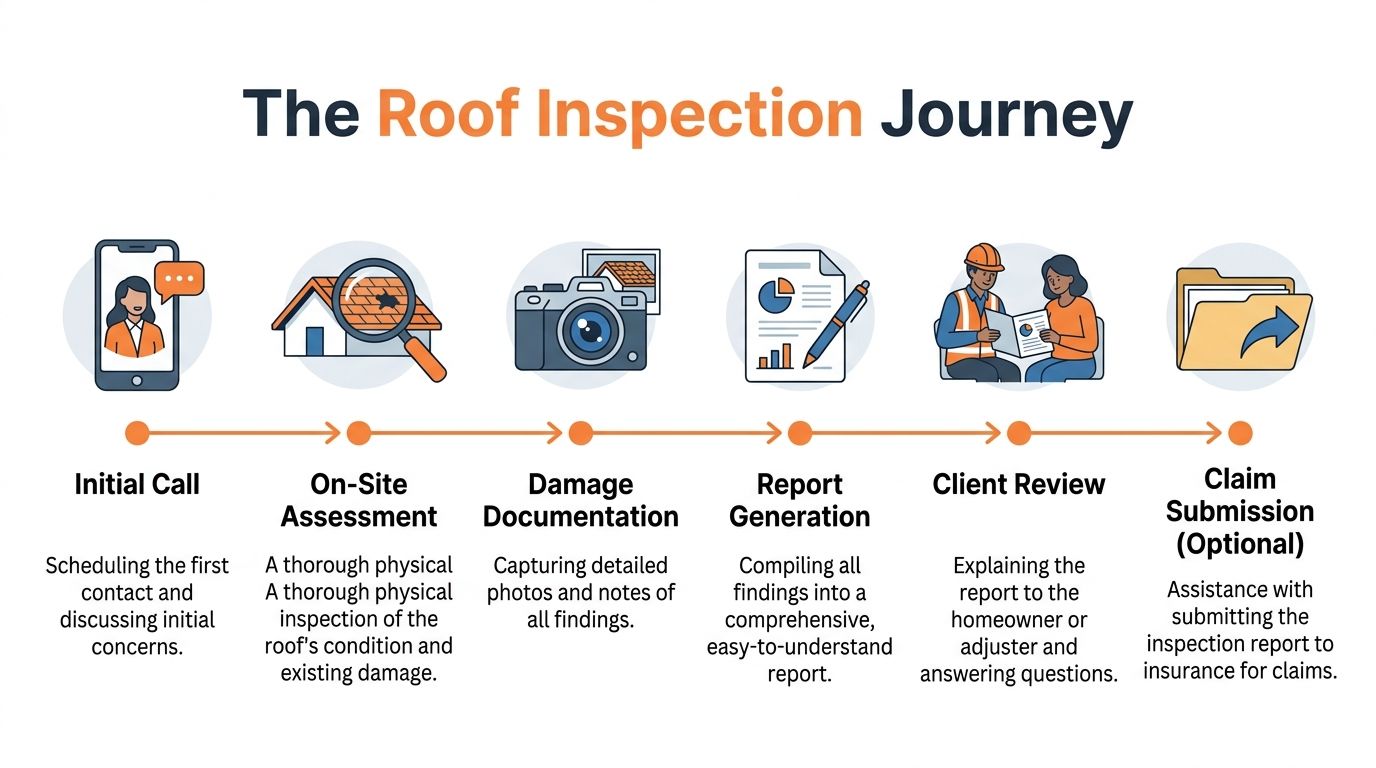
The Roof Inspection Process from First Call to Final Report
A reliable inspection follows a sequence. That sequence protects the people on site and protects the claim file.
The process below is what adjusters should expect when they hire a professional inspection team for a high-risk property.
Step one starts before arrival
The first call is not just scheduling. It is intake.
The inspector should gather the property type, number of stories, roof pitch concerns, storm date, current leak activity, occupancy status, and whether temporary protection is already in place. If the structure is steep or tall, access planning begins here.
A tool category such as an aluminum folding ladder for home signals part of the practical planning involved. Access equipment selection is not cosmetic. It affects whether the team can reach critical areas safely and document them properly.
The five-zone evaluation that prevents incomplete files
For steep and tall roof inspections, a five-zone detailed evaluation is critical: interior, attic, perimeter, garage, and rooftop. This method is important because hidden defects and incomplete documentation contribute to 70-80% of insurance claim denials, and a methodical inspection can reduce claim cycle time by 25-50% through defect mapping, infrared thermography, and ladder-assist protocols, according to the National Roof Certification and Inspection Association at NRCIA.
Each zone serves a separate purpose.
Interior
Inspectors start inside because ceilings and wall transitions often show where water is presenting, not necessarily where it entered.
They look for stains, active moisture indicators, texture disruption, and spread patterns. The goal is to identify rooms of concern and compare those findings to roof features directly above.
Attic
The attic often tells the truth that the roof surface hides.
Inspectors check for structural concerns, daylight at penetrations, sheathing staining, ventilation deficiencies, and moisture patterns. On storm claims, this zone helps separate long-term condensation issues from recent intrusion.
Perimeter
The perimeter review covers eaves, rake edges, downspouts, flashing visibility, and gutter condition.
Granules, displaced components, impact debris, and edge distortion frequently show up here first. The perimeter also helps document storm-created collateral conditions without stepping onto the roof immediately.
Garage
The garage is easy to skip and a common place to miss secondary leak paths.
Attached garages often include transitions, step flashing, lower-slope tie-ins, and ceiling evidence that supports the rest of the file.
Rooftop
Only after the lower-risk zones are documented should rooftop access proceed, if conditions allow.
At this stage, the inspector maps the damaged elevations, checks penetrations and flashings, reviews field shingles or membrane condition, and captures close-up images that connect observed defects to the reported event.
What the site visit should produce
A professional site visit should leave behind more than photos on a phone.
Expect these outputs:
- Damage mapping: Marked locations by slope, elevation, or roof section
- Photo documentation: Overview images plus close-ups of specific defects
- Moisture-related findings: Infrared or corroborating signs where appropriate
- Access notes: Why the team used ladder assist, drone support, or limited-walk methods
- Mitigation recommendations: Whether tarping or temporary sealing is needed now
The strongest roof report reads like a field record, not a sales brochure. Every image and note should answer a claim question.
Why this process moves claims faster
A disciplined inspection reduces the chance that a desk adjuster has to ask basic follow-up questions later. It also lowers the need for a second visit to verify areas that should have been documented the first time.
That is the practical value of process. Not more paperwork. Better first-pass accuracy.
Decoding the Inspection Report What Adjusters and Homeowners Need to See
The inspection is only half the job. If the report is weak, the field work loses value.
Adjusters need a report that supports review without forcing them to reconstruct the roof in their heads. Homeowners need a report they can read without guessing what the photos mean.
What separates a usable report from a vague one
A strong report does three things at once. It shows the roof’s condition, explains the significance of the observed defects, and ties those observations to specific locations.
Look for these core elements:
- Annotated photos: Not images, but labeled images showing where on the roof the defect sits
- Roof diagrams or aerial references: Useful for mapping slopes, ridge lines, penetrations, and impact areas
- Interior-to-exterior correlation: Ceiling stain locations matched to attic or roof findings
- Clear scope language: Repair, replacement, temporary mitigation, or further evaluation
- Estimate support: Line-item detail that fits carrier review workflows
How adjusters can read the report efficiently
A practical way to review a roof report is to work from broad to specific.
Start with the summary. Then verify the roof map. After that, review penetrations, flashing, transitions, and field-surface findings. End with any estimate pages and mitigation notes.
If the report is strong, you should be able to answer these questions quickly:
| Review question | What the report should show |
|---|---|
| Where is the damage? | Slope-by-slope or elevation-specific mapping |
| What kind of damage is it? | Wind, impact, water entry, wear, prior repair, or mixed condition |
| How was it documented? | Photos, measurements, thermal review, access notes |
| What needs action now? | Tarping, temporary repair, interior drying, further inspection |
A weak report usually fails at location specificity. It may say “roof damaged by storm” without showing which elevations, which penetrations, or why the damage is functionally significant.
Why detail matters outside the roof itself
Roof reports also help with surrounding components. Weatherstrip, trim interfaces, and accessory seals can influence how water presents after wind-driven rain. That is why details at doors, attached structures, and transitions should not be ignored, especially where the building envelope ties into roof drainage paths. In practice, items as basic as a weatherstrip seal kit for doors, roof rail, and trunk interfaces remind adjusters that water entry complaints are not always from a single failed shingle line.
If a report forces the adjuster to request new photos, unlabeled slope references, or clarification about leak origin, the inspection was not finished.
Homeowners should also check whether the report distinguishes observed facts from recommendations. Good reports do not blur the two. They show what was found first, then explain what action those findings support.
Emergency Services Ladder Assist and Rapid-Response Tarping
Some roof calls are not inspection calls. They are stabilization calls.
If a storm has opened the roof system and water is entering, the first priority is to protect the structure while preserving evidence. That is where ladder assist and emergency tarping become part of the inspection workflow rather than separate side services.
Why ladder assist matters to adjusters
Ladder assist allows adjusters to inspect properties they should not access alone. On steep or tall roofs, that support reduces the chance of an unsafe climb, a poor vantage point, or missed damage at critical transitions.
A roof hook stabilizer setup such as ladder roof hook stabilizers with wheels and rubber grip steel reflects the kind of equipment category used to create stable positioning on difficult surfaces. The point is not the hardware itself. The point is that high-risk access needs planning, control, and trained execution.
Why emergency tarping is part of claim accuracy
Tarping is often treated as a separate emergency trade. On storm losses, it should be integrated with documentation.
The crew should document the exposed area before covering it, note the apparent entry point, record the extent of temporary protection, and preserve visibility into what remains unresolved. Done well, tarping helps the claim. Done poorly, it can hide conditions or create disputes about what existed before the temporary repair.
This video shows the kind of field environment where quick, safe roof response matters:
What effective rapid response looks like
A useful rapid-response visit should accomplish four things in one trip:
- Stabilize active exposure: Cover open areas and reduce continuing interior damage
- Capture conditions first: Photograph and map damage before the temporary repair changes the scene
- Support adjuster access: Provide safe observation points where needed
- Set up the next phase: Leave a clear record for estimate writing and follow-up inspection
When these services are coordinated, the property is safer, the owner sees immediate action, and the claim file gets stronger instead of more fragmented.
How to Find and Schedule Reliable Roof Inspection Services
Typing “roof inspection services near me” is a start. It is not enough if the property is steep, multi-story, or storm-damaged.
The better search is more specific. Use terms that filter for capability, not proximity.
Search for the right kind of provider
Use searches like these:
- Certified steep roof inspector near me
- Ladder assist roof inspection
- Emergency roof tarping service
- Storm damage roof inspection for adjusters
- Tall roof inspection drone and infrared
Those terms push past generic free-estimate pages and toward companies that understand claim documentation and difficult access.
Ask questions that expose the full process
When you call, do not ask only about availability. Ask about method.
Use a short checklist:
- Who performs the inspection? Ask whether they use certified field inspectors for steep and tall roofs.
- How do they handle unsafe access? You want a clear answer involving ladder assist, drones, or controlled alternatives.
- What does the report include? Look for photos, roof mapping, location-specific findings, and estimate-ready detail.
- Do they handle emergency mitigation? A provider should be able to address urgent exposure or coordinate it immediately.
- How do they protect the crew on site? Safety protocols matter. Even basics like a reflective safety jacket with hood, ANSI-certified point to whether a company treats field safety as operational reality rather than a slogan.
What to avoid
Be cautious if the company:
- Leads only with “free”
- Cannot explain steep-roof procedure
- Promises conclusions before seeing the site
- Offers vague reports with no sample format
- Treats tarping, access, and documentation as separate disconnected tasks
A reliable inspection partner should sound organized from the first phone call. If the scheduling conversation is sloppy, the field report often is too.
Frequently Asked Questions About Roof Inspections
Do I need a local company for roof inspection services near me if the property is high-risk
Not necessarily. What matters is whether the provider can deploy qualified inspectors to your location and handle steep, tall, or storm-damaged roofs safely. For difficult properties, capability matters more than a nearby mailing address.
What should an adjuster ask for before scheduling
Ask about safe access methods, whether they provide ladder assist, how they document findings, and what the final report includes. If the provider cannot describe the inspection process clearly, that is a warning sign.
Are drones enough for a storm inspection
Sometimes they help a lot, especially on tall structures. They are not always enough by themselves. Some losses still require close documentation at penetrations, transitions, or interior correlation points.
Should emergency tarping happen before the inspection
If water is actively entering, temporary protection should not wait. The key is to document exposed conditions before and during the mitigation work so the claim file stays clear.
What makes a roof report useful to both adjusters and homeowners
Clear location references, annotated photos, practical findings, and a direct explanation of what needs immediate action versus what needs longer-term repair evaluation.
If you need a claim-focused roof inspection partner for steep roofs, tall structures, storm damage, ladder assist, or emergency tarping, Fox Claims Consultants LLC provides nationwide property inspection support with safety-conscious field documentation and reporting built for adjusters, carriers, and property owners.
Leave a Reply