
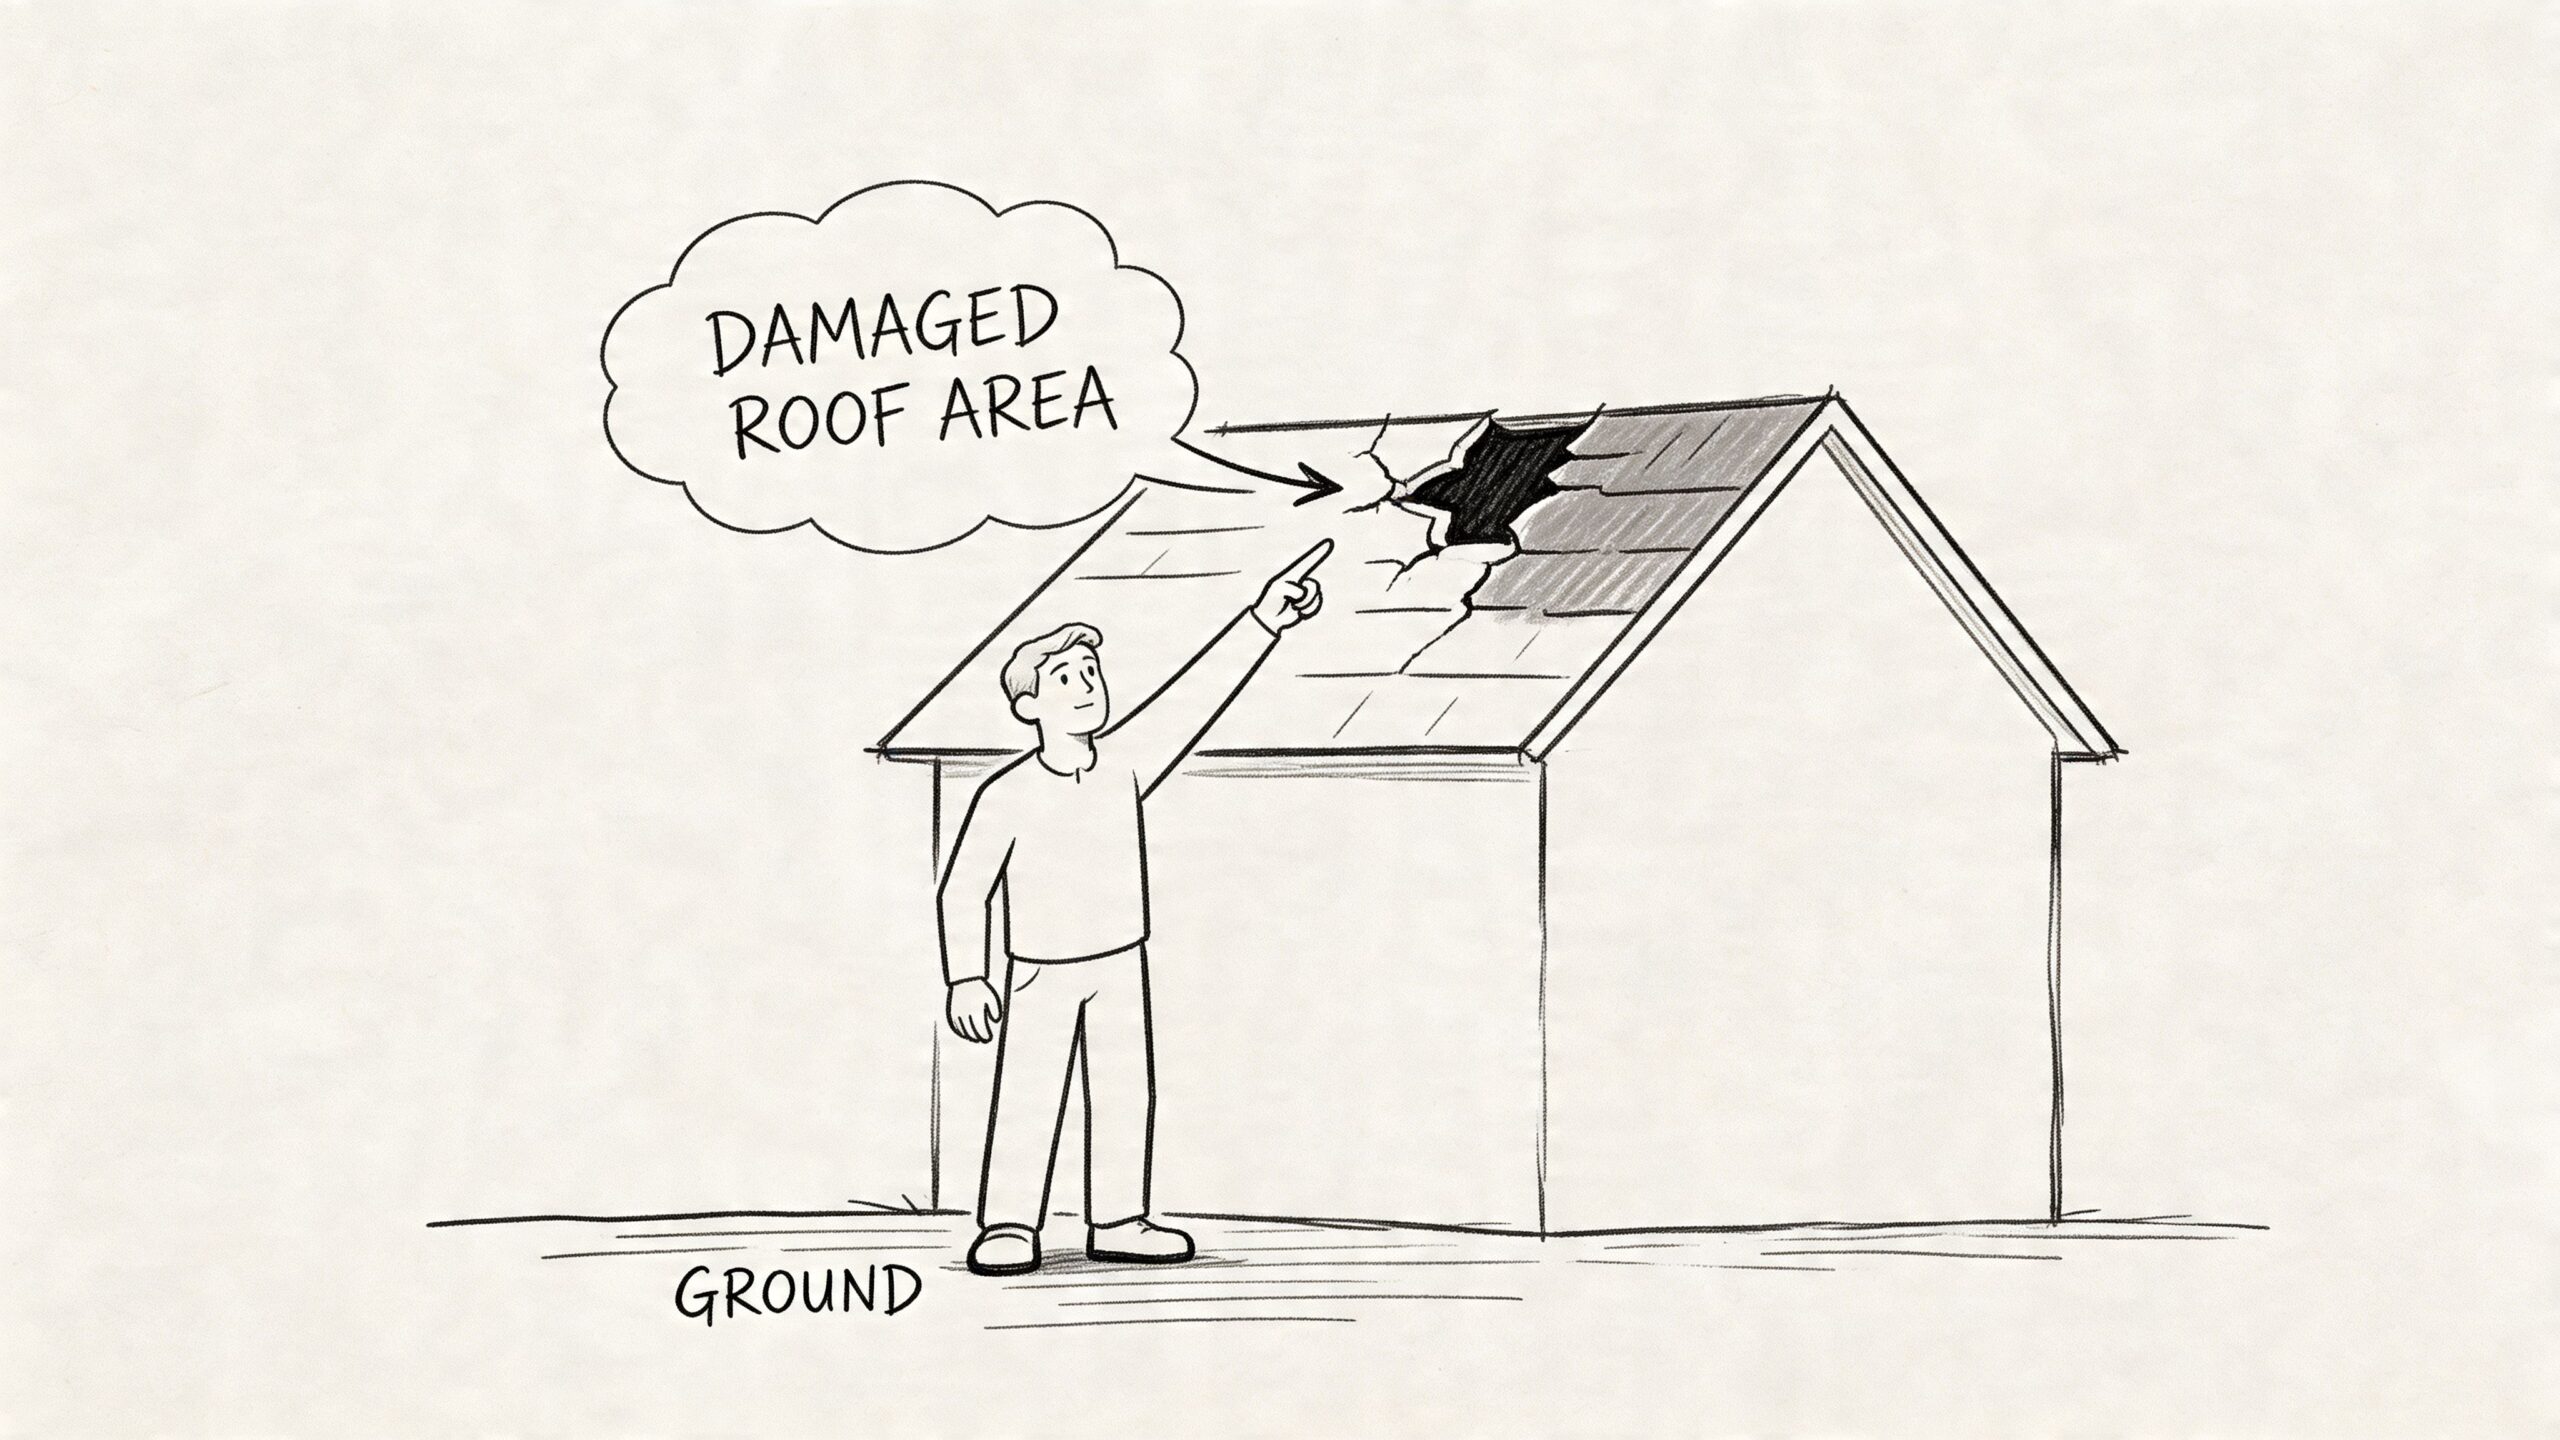
The call usually comes after the storm has already moved on. Water is spotting the ceiling. A tree limb hit the slope over the garage. Shingles are in the yard, and nobody knows whether the leak started ten minutes ago or ten hours ago. At that point, emergency roof tarping isn’t a convenience. It’s the move that separates controlled damage from a much larger loss.
From a claims perspective, the tarp job matters for two reasons at once. It has to keep weather out, and it has to stand up to scrutiny later. Carriers want proof that reasonable mitigation happened. Homeowners want to know the temporary fix won’t fail in the next round of wind. Contractors want a stable site so permanent repairs can be scoped correctly. Those goals line up when the tarp is installed to professional standards and documented clearly.
The Critical First Response to Roof Damage
The first hours after roof damage are chaotic because the problem looks smaller from the ground than it is inside the assembly. Water doesn’t stay where it enters. It tracks along decking, rafters, insulation, and wall cavities. By the time a stain shows up in a hallway or bedroom, the path above it may be much wider than anyone expects.
That’s why emergency roof tarping is a mitigation step, not a cosmetic patch. Industry data indicates that secondary water damage from delayed mitigation can account for up to 80% of total storm-related repair costs, and professional installation can reduce water ingress by up to 95% in windy conditions when action is taken promptly, according to Jamar Roofing’s emergency roof tarping guidance.
Practical rule: If the roof envelope is open, the job is no longer “wait and see.” It’s “stabilize first, investigate second.”
For adjusters, that urgency affects file quality. A well-timed tarp limits overlapping damage, makes causation easier to evaluate, and reduces disputes over what came from the storm versus what came from delay. For homeowners, it protects insulation, framing, drywall, flooring, and contents before saturation spreads the loss further.
Professional crews also work differently than the average emergency call suggests. They don’t just throw plastic over a hole and hope. They assess slope, wind exposure, drainage path, edge security, and penetrations. They think about what the tarp will do overnight, not just whether it looked secure for five minutes at installation.
A simple way to think about it is this:
- Open roof equals active loss: Rain and wind keep working until the opening is controlled.
- Delay complicates claims: More affected materials means more line items, more ambiguity, and more inspection time.
- Temporary protection preserves options: It buys time for accurate estimating, contractor scheduling, and carrier review.
- Safety still comes first: Night work, wet decking, and energized hazards can turn a mitigation call into an injury scene.
Even exterior visibility matters after dark. Good site lighting helps crews document and stage safely, and tools such as an outdoor flood security light setup can improve visibility around access points while interior protection and exterior prep are underway.
Triage and Safety Assessment Before You Tarp
A bad tarp decision usually starts before anyone leaves the ladder. The mistake is treating every damaged roof as a candidate for immediate access. Some are. Some aren’t.
The first pass should happen from the ground. Binoculars help. So does a slow walk around the structure, looking at eaves, ridges, valleys, and any area where debris impact is visible. If the roofline is visibly deformed or the structure looks racked, don’t convert a property loss into a rescue event.
Start with the no go conditions
The fastest professional decision is often “nobody goes up there yet.” That call protects everyone involved.
Red flags that stop roof access include:
- Downed or nearby power lines: Electrical hazards change the whole response.
- Sagging roof planes: A depression or uneven line may indicate structural compromise.
- Interior wall cracking tied to the event: That can suggest movement beyond the roof covering.
- Tree load still on the roof: A limb or trunk can be holding damaged framing in place.
- Active weather or slick surfaces: Wet debris, hail residue, and unstable footing make falls more likely.
If any of those are present, the right move is controlled stabilization from below, perimeter safety, interior water management, and escalation to properly equipped professionals. On steep systems, crews should be working with rated fall protection and eye protection such as ANSI Z87 safety glasses, along with the rest of the required access gear.
A tarp is never worth a fall. If the deck, framing, or access path is questionable, the assessment comes before the installation.
Identify damage that usually can be tarped
Not every roof issue needs the same response, but several conditions commonly call for temporary covering when the structure remains stable.
Typical candidates include:
- Localized punctures from branches or debris where the damaged field can be covered cleanly.
- Missing shingles or torn sections that expose underlayment or decking to incoming weather.
- Damage around penetrations where a vent, pipe boot, or flashing area has been opened by wind or impact.
- Ridge or upper slope openings that can feed water downslope into broad sections of the home.
- Tree-damage openings after debris removal when a roofer or mitigation crew has confirmed the area is safe enough for temporary protection.
What matters is not only the visible hole. It’s whether water is likely to keep entering before permanent repair happens. A small opening high on the slope can create larger interior damage than a more dramatic-looking break near an overhang.
Make the go no go call like an inspector
Claims professionals and informed homeowners both benefit from a simple decision framework.
| Condition on site | What it usually means |
|---|---|
| Roof covering loss, stable framing, safe access | Tarping may proceed with proper equipment |
| Structural sag, shifting, or heavy impact load | Stop and escalate for structural review |
| Dry opening with more weather coming | Tarp sooner rather than later |
| Interior leak with no visible exterior point | Investigate carefully before placing tarp |
| Complex steep roof with valleys and penetrations | Use trained, insured crew, not improvised access |
Protect people before property
Once the roof is judged safe enough for mitigation, crews still need to control their work zone. Ladders should be set on stable footing. Access points should be clear of debris. Ground personnel should stay out of drop zones where tools, branches, or loose roofing may fall.
This matters for liability as much as workmanship. A poor emergency response can create a second claim involving injury or additional property damage. Professional teams reduce that exposure by treating tarping as field risk management, not just temporary repair.
For homeowners, the safest contribution is often documentation from the ground, interior containment, and communication with the carrier. For adjusters, the best outcome is a site that was triaged correctly the first time, with hazards identified before anyone started fastening a tarp to a compromised roof.
Gathering Professional Grade Tarping Materials and Tools
A tarp fails long before it blows off. It fails when the wrong material is chosen, when edge security is improvised, or when the installer treats UV, wind, and drainage as afterthoughts.
The gap between consumer plastic sheeting and a field-ready roof tarp is substantial. After major storm activity, that gap becomes obvious fast because supply gets thin and people start using whatever they can find. That’s when short-lived material causes long-lived claim problems.
What professionals look for in the tarp itself
The first standard is material quality. For steep or exposed roofs, crews typically want a heavy-duty tarp in the 10 to 12 mil range with UV resistance, because post-2025 mega-storms highlighted a 30% increase in tarp failure rates tied largely to standard polyethylene degrading under UV exposure in 2 to 4 weeks, with shortages also delaying protection in affected areas, according to The Shingle Master’s emergency tarping best practices.
That has practical consequences:
- Thin consumer tarps tear at fastener points and degrade faster in sun.
- Non-UV-rated material may look fine on day one and fail before permanent repair is scheduled.
- Undersized tarps force bad edge placement and weak overlap.
- Industrial-grade stock gives crews enough working material to route water beyond the damaged zone.
Why battens beat loose edges
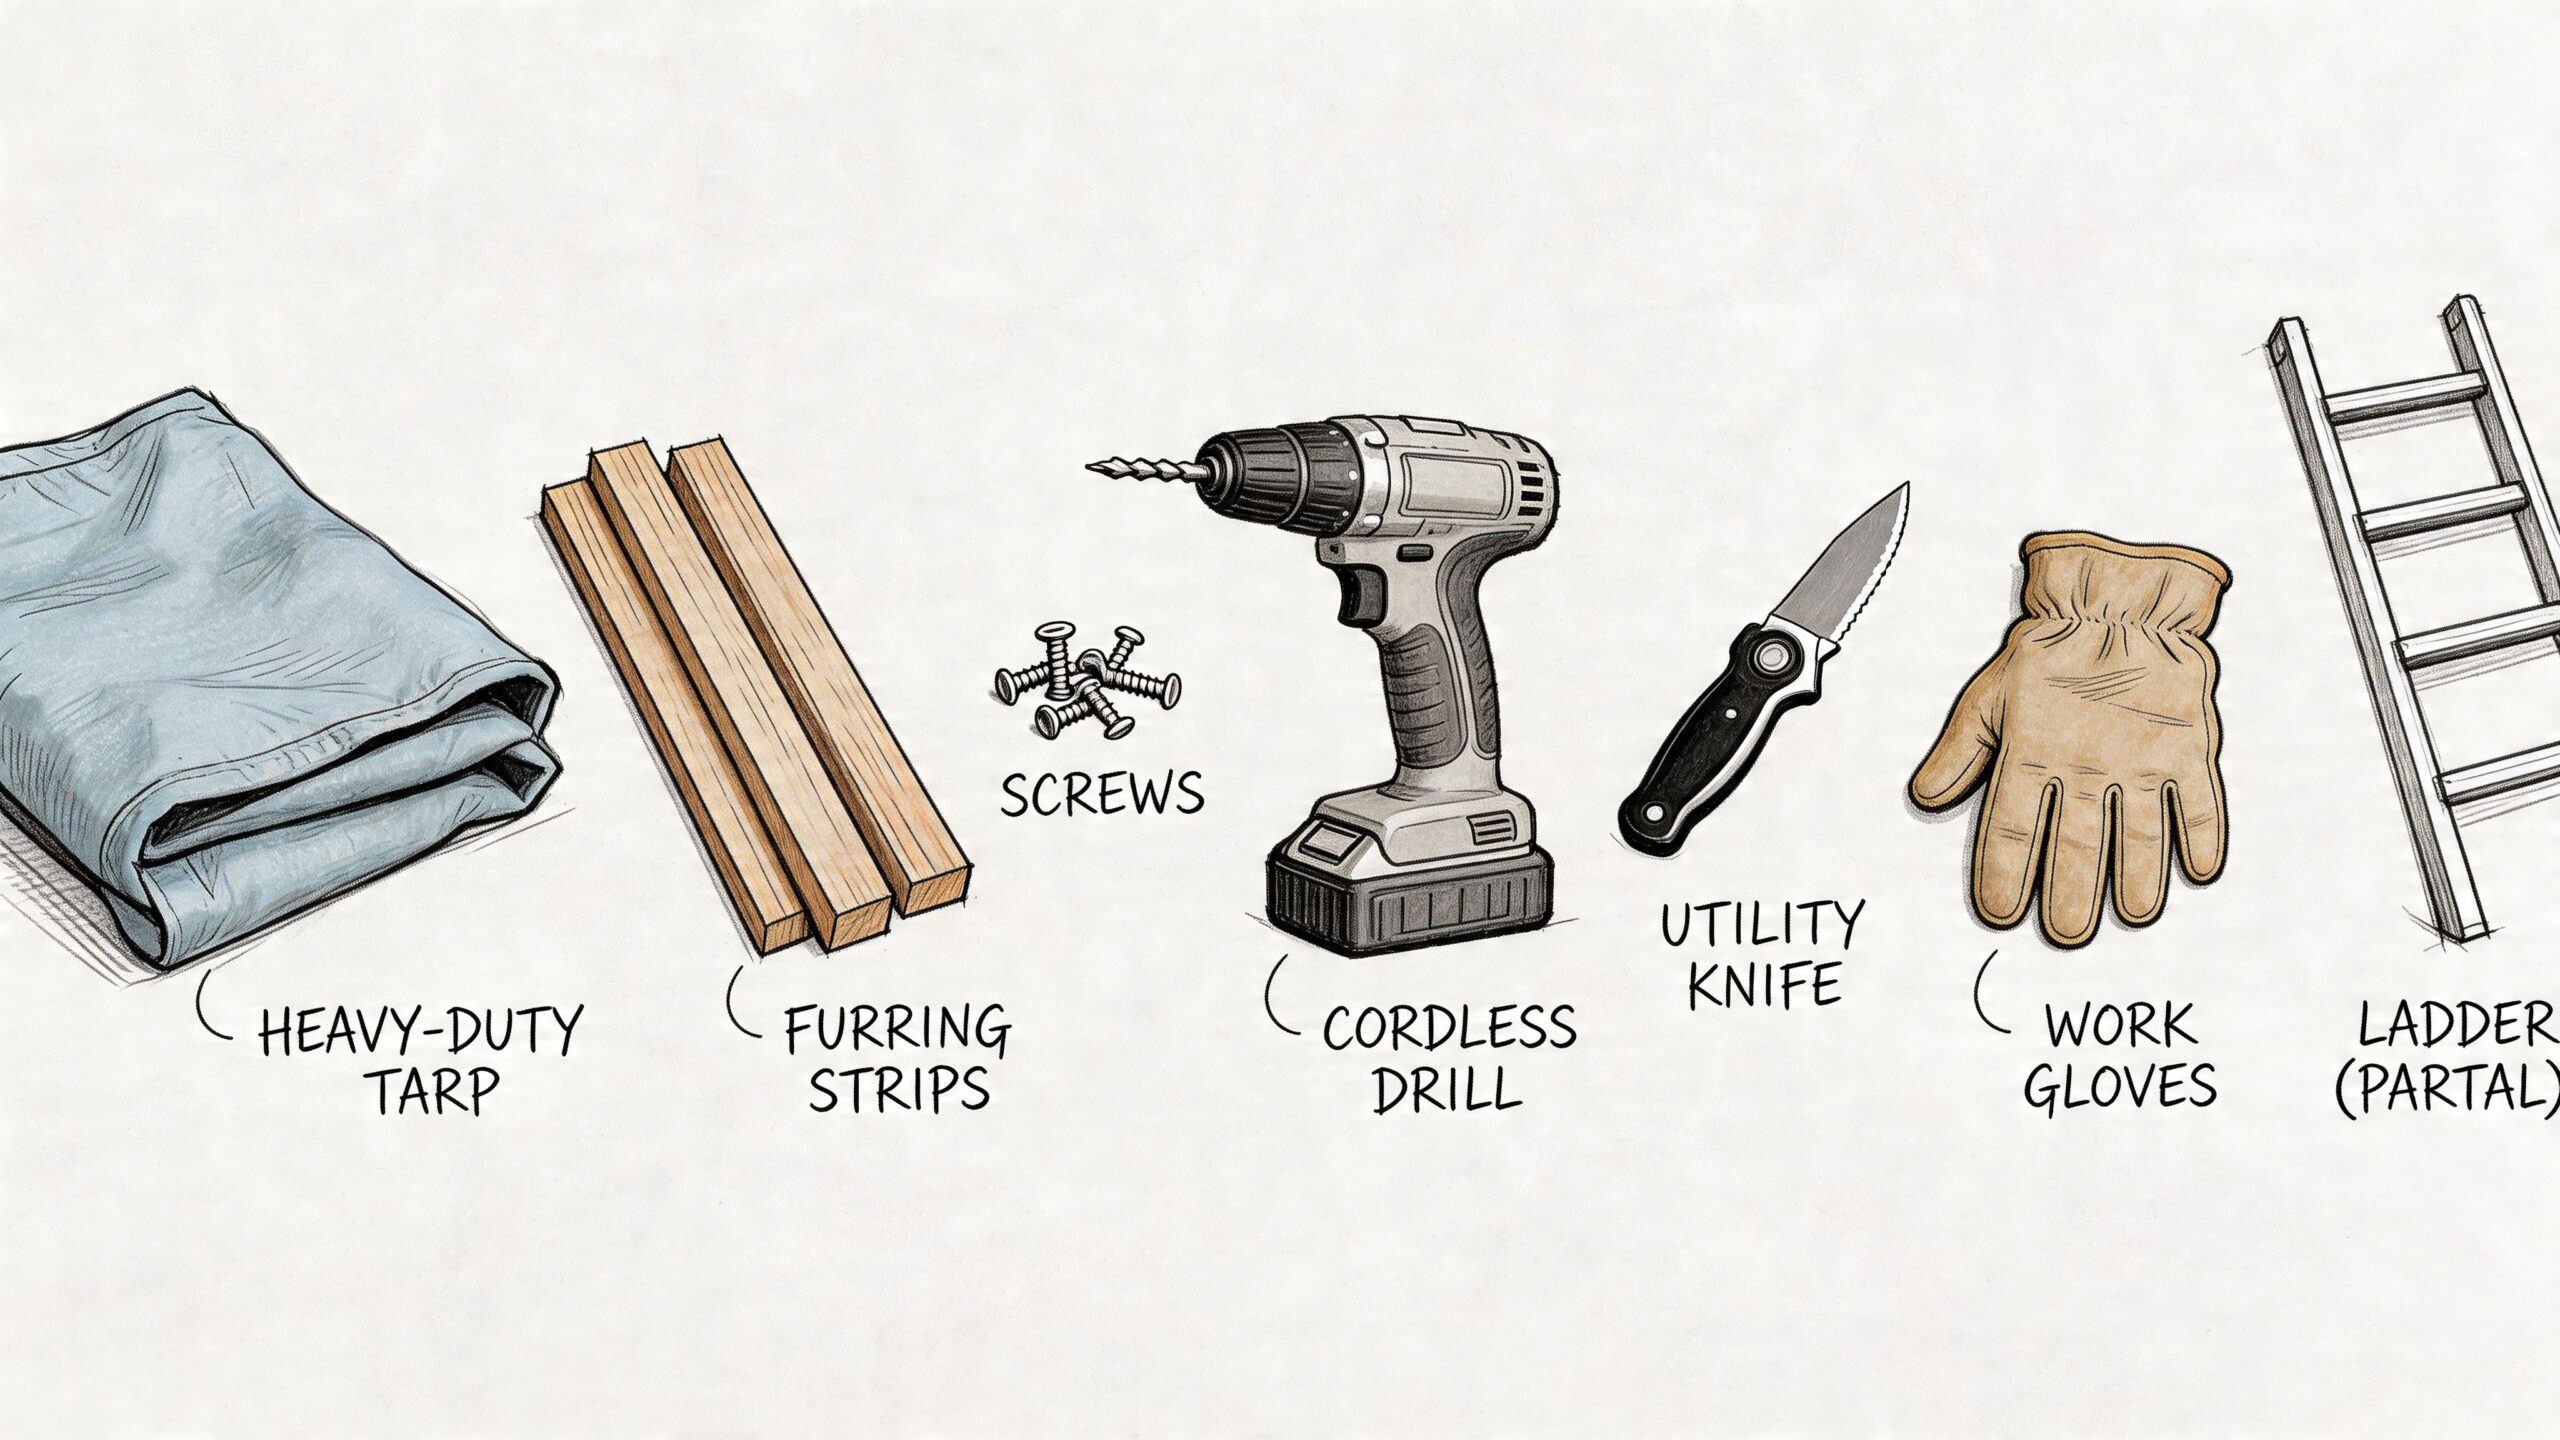
Professionals don’t rely on a few nails through the tarp edge and call it secure. They use wood members such as 1×3 furring strips or 2×4 battens to spread load, reduce tear-out, and hold the tarp in a controlled line. That detail is what lets the material act like a temporary roof surface instead of a sail.
A better setup usually includes:
- Heavy-duty tarp
- 1×3 or 2×4 lumber
- Deck screws or approved fasteners
- Cutting tools
- Seal tape for penetrations
- Ladder and fall protection
- Tie-down hardware where site conditions call for it
For supplemental securement and staging, gear such as 2-inch ratchet tie-down straps can be useful on site, though the roof assembly itself still needs proper fastening methods suited to the structure and slope.
Preparedness is part of the service
The storm-season reality is simple. The right tarp on the wrong day is no help if nobody has it. Shortages after major events change response quality because crews may be forced into substitutions, delayed installs, or partial coverage.
That’s one reason some inspection and mitigation partners maintain deployable inventory rather than depending entirely on same-day retail sourcing. Fox Claims Consultants LLC provides emergency tarping as part of rapid field response, which matters when adjusters need stabilization and documentation without waiting for local stock to recover.
Field note: The material list is part of the claim story. When a tarp holds, it supports the mitigation decision. When it fails early, everyone spends time sorting out whether the storm or the installation caused the renewed intrusion.
The Field-Tested Emergency Roof Tarping Procedure
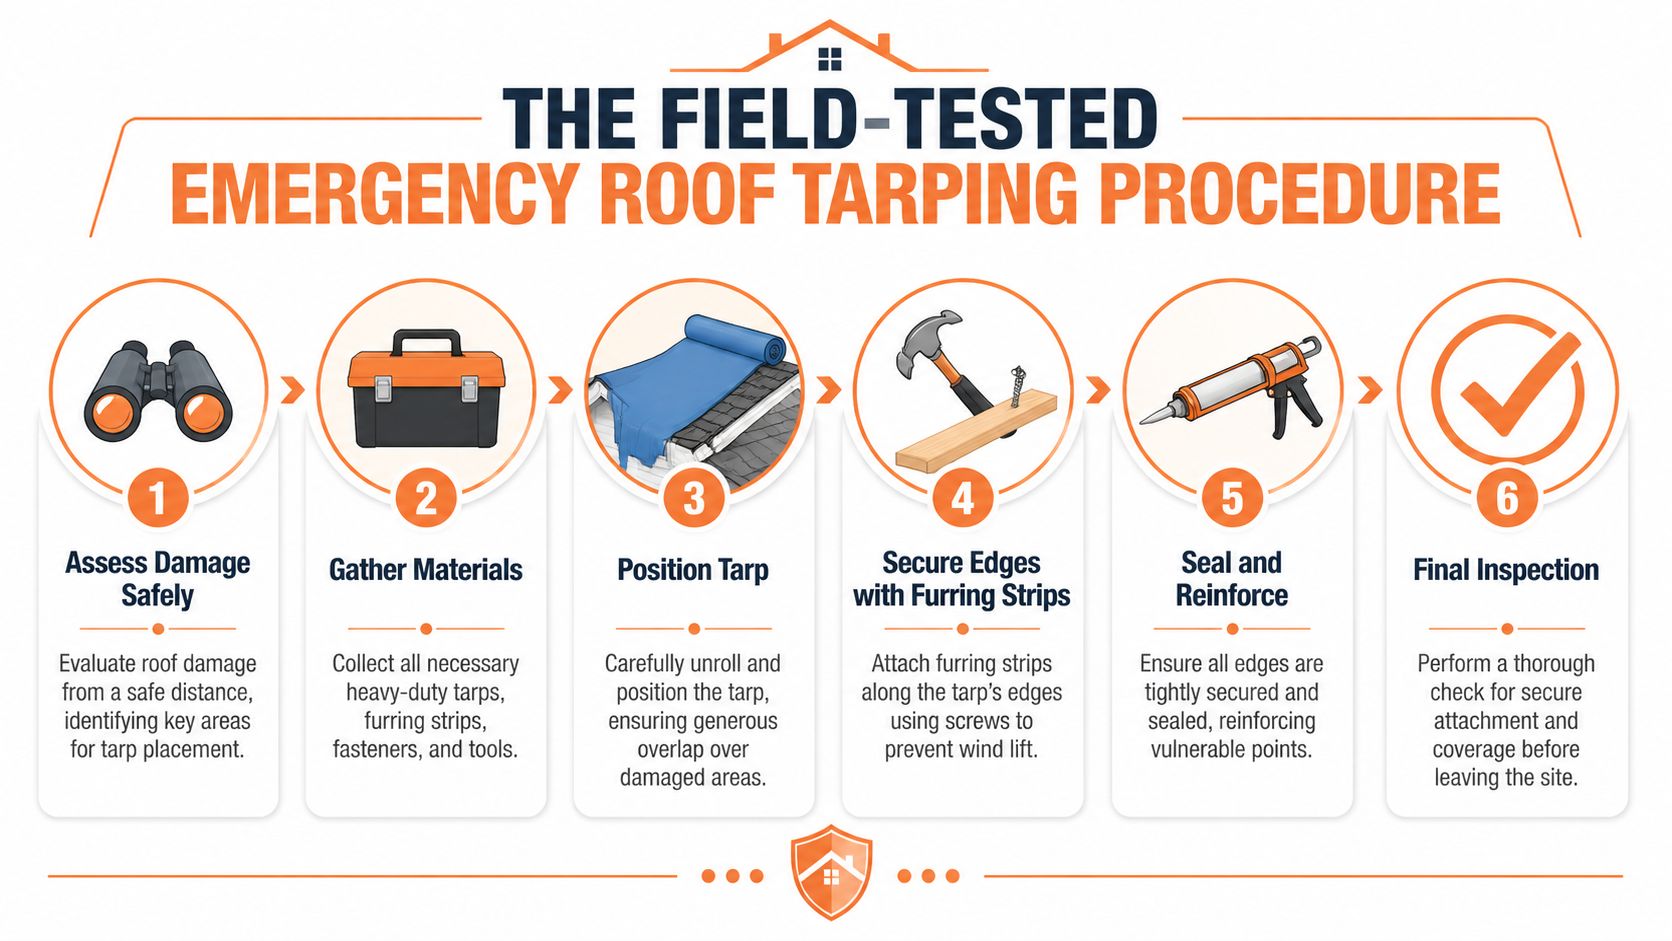
A storm has already opened the roof. The tarp now has to do two jobs under pressure. It has to shed water immediately, and it has to hold up well enough that the mitigation decision stands if weather turns again before permanent repairs begin.
That is where professional standards matter. A field install should create a controlled drainage path, limit added damage from the mitigation itself, and leave a clear record that the roof was stabilized in a defensible way. For adjusters, that distinction affects claim handling. For homeowners, it affects whether a temporary measure protects the structure or becomes part of the loss.
The sequence is easier to follow visually:
Phase one assessment sizing and prep
Start by mapping the damaged field from the ground, then confirm dimensions at the roof only if access remains safe. The tarp needs to extend well past the visible opening so runoff clears the compromised area instead of finding the edge and reentering. In practice, crews leave enough upslope and side coverage to create a real watershed, not a cosmetic patch.
That sizing decision has claim consequences. A tarp cut too tight may look acceptable in a completion photo, but if water tracks under the edge during the next rain, the file quickly turns into a dispute over whether the new interior damage came from the storm or from inadequate mitigation.
Before the tarp is opened, crews should:
- Clear loose debris without disturbing unstable materials.
- Mark vents, stacks, skylights, and metal transitions that will affect layout.
- Confirm where battens will fasten into sound substrate.
- Set a ladder path and material staging area that keeps tools from sliding downslope.
Large punctures and impact holes sometimes need a rigid backer under the tarp. A sheet of plywood over the opening can prevent sagging, keep broken edges from cutting the material, and give the temporary cover a flatter bearing surface. The goal is temporary stabilization, not structural repair.
Phase two secure the high side and establish the watershed
The upper anchor line determines whether the system sheds water correctly. On a sloped roof, the tarp should be taken over or secured from the undamaged high side so water flows across the surface and off the roof, rather than pressing into an exposed top edge.
A dependable sequence looks like this:
- Dry-fit the tarp and confirm full coverage before fastening.
- Wrap the high-side edge around a 1×3 or similar batten.
- Roll the material tight enough to spread load across the edge.
- Fasten that batten into stable framing or solid decking as conditions allow.
Crews that rush this step create problems that show up later. A loose top edge pumps in the wind. An anchor line placed too low can direct runoff toward the opening. Fasteners driven into rotten or fractured decking may hold long enough for photos, then fail on the next gust.
For roofers or mitigation crews carrying pneumatic tools while they work through the fastening pattern, a retractable rafter hook hanger helps keep equipment controlled at the eave and along the slope.
Build the water path first. Then secure the material to support it.
Phase three work around penetrations and transitions carefully
Penetrations are where improvised tarp jobs usually start leaking. Plumbing vents, furnace flues, skylights, satellite mounts, and wall intersections all interrupt drainage and create lift points.
Handle each one deliberately. Make only the cuts needed for fit. Keep the tarp lying flat to the roof plane. Seal and fasten around the penetration so the opening does not become a funnel for runoff. If a vent layout forces awkward bunching or leaves unsupported voids, change the tarp layout instead of forcing the material into a bad pattern.
Valleys deserve the same attention. They carry concentrated water. A tarp that bridges a valley loosely can trap runoff, flap under wind load, and wear through faster than the surrounding field.
Phase four tension the field and finish the perimeter
Once the upper edge is locked in, the rest of the system is about controlled tension. Battens or securement strips should pull the tarp flat enough that wind cannot get under broad sections of material. The perimeter needs the same discipline. Side edges and the lower edge should be secured in a way that resists uplift without creating unnecessary new penetrations.
Field crews usually check four things before calling the roof stabilized:
- Side edges are controlled: No loose laps or exposed corners for wind to catch.
- Lower edge drains cleanly: Water leaves the tarp without backing up at the eave.
- The field is taut: No large bellies where water can pond or fabric can slap.
- Stress points are reinforced: Corners, penetrations, and transitions get another close look.
Then inspect it again from below and from a different angle. Many weak installs look fine at arm’s length and show their flaws only when you step back and read the drainage path across the whole slope.
This walkthrough is worth seeing in motion before anyone tries to replicate it on a live claim:
What fails in real claims
The recurring failures are predictable, and they matter because they create liability after the initial storm loss.
| Poor practice | What it leads to |
|---|---|
| Tarp sized only to the visible hole | Runoff reaches the edge and reenters the roof system |
| Fasteners driven through unsupported fabric | Tearing, enlarged holes, and early pull-out |
| No high-side watershed strategy | Water works under the tarp from above |
| Loose spans between securement lines | Flapping, abrasion, and wind damage to the tarp itself |
| Sloppy cuts at vents and stacks | Repeat leakage at penetrations |
Good emergency tarping usually looks plain. Straight battens, tight material, controlled edges, and a drainage path that makes sense. That is what experienced adjusters expect to see, and it is what informed homeowners should demand when temporary protection has to hold up under scrutiny.
Photo Documentation for a Smooth Insurance Claim
A tarp job isn’t complete when the screws are in. It’s complete when an adjuster, carrier, contractor, or owner can look at the file and understand exactly what happened, what was exposed, how it was stabilized, and what remains to be repaired.
Good documentation reduces back-and-forth because it answers the obvious questions before anyone has to ask them. It also protects the mitigation decision if later weather affects the property again.
What to photograph before during and after
The cleanest claim files follow a simple sequence. Capture context first, then details, then proof of the completed stabilization.
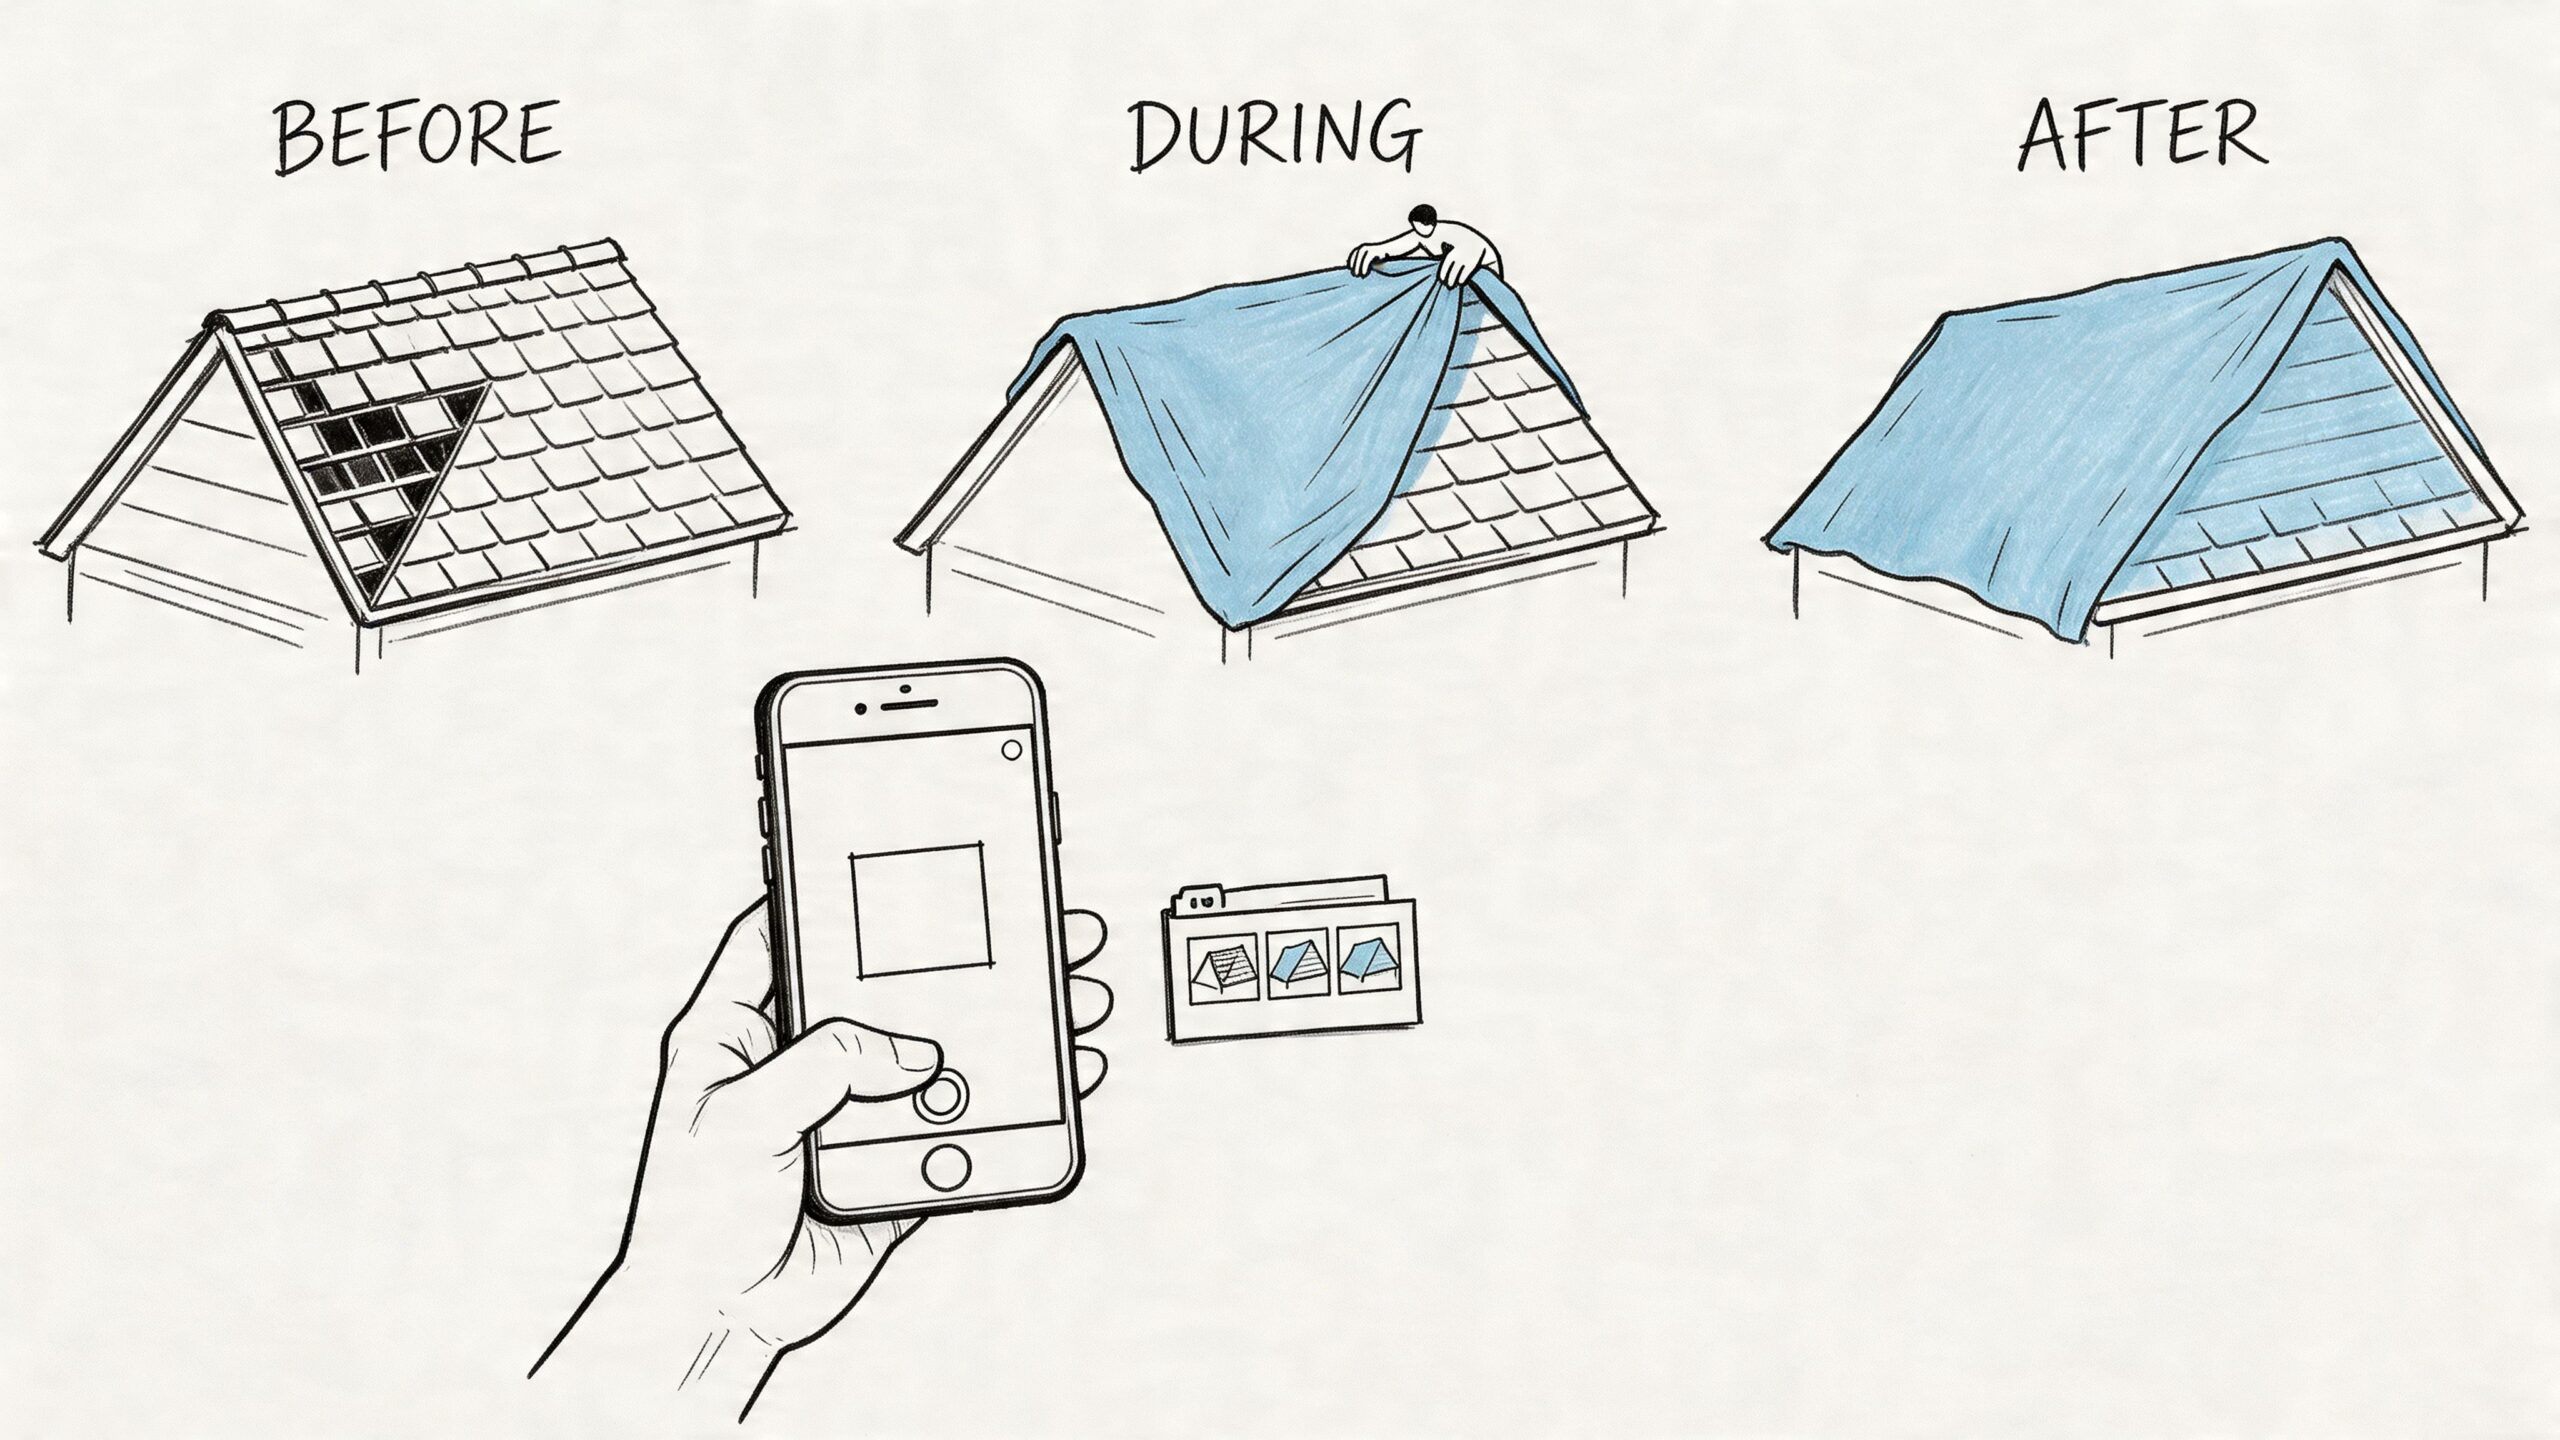
A practical set includes:
- Overview images: Front, rear, and each damaged elevation so the roof area is tied to the structure.
- Damage close-ups: Missing covering, punctures, displaced flashing, impact points, and any visible decking exposure.
- Interior correlates: Ceiling stains, wet insulation, attic intrusion paths, and affected rooms.
- Process photos: Material staged, tarp being positioned, battens or ridge-side securement, and penetration handling.
- Completion shots: Wide and mid-range views that show full coverage and fastening pattern.
- Safety images when relevant: Harness use, ladder setup, controlled access, and edge management on steep slopes.
For steep roofs over 6:12 pitch, professional protocol includes a full-body harness with dual lanyards and top-edge anchoring under ridge shingles or with battens nailed every 12 inches. Photo-documenting that level of safety and stability can slash claim cycle time by up to 50%, according to Baltic Roofing’s tarping protocol.
Document like the file may be reviewed months later
The most useful photos aren’t artistic. They’re legible and purposeful.
A few habits make a difference:
- Keep orientation clear: Start with broad shots before moving in tight.
- Show scale: Include reference points such as vents, valleys, windows, or eaves.
- Avoid motion blur and dirty lenses: Small lens tools like portable camera lens cleaning pens help keep detail sharp when crews are moving between rain, dust, and attic spaces.
- Capture fastening detail: If battens, strapping, or sealed penetrations matter, get close enough to prove the method.
- Take final verification from the ground: That angle often shows whether the tarp follows drainage and sits tight.
The photo set should answer three questions without explanation. What was damaged, what was done, and does the temporary repair look stable?
Why this matters for liability and payment
Emergency work often gets questioned later if the file only contains one or two distant shots of a blue tarp on a roof. That doesn’t show whether the opening was real, whether the coverage was adequate, or whether the install itself may have created added damage.
Thorough documentation helps all sides. Adjusters can reserve and evaluate more confidently. Homeowners can support reimbursement for mitigation costs. Contractors can scope permanent repairs against a known temporary condition instead of guessing what changed between the storm date and repair date.
For anyone handling multiple files, the pattern is obvious. The claims that move smoothly usually have a clean visual record from first damage through completed stabilization.
After the Tarp What Comes Next
A tarp changes the risk profile of the loss. It slows additional water entry, protects exposed decking and interiors, and gives the claim a stable point of reference. It also starts a clock. Temporary protection has to be checked, documented, and followed by a permanent repair plan before weather, UV exposure, or job-site delays create a second round of damage.
That follow-up matters for liability as much as property protection. If the tarp loosens, ponds water, or tears loose in wind, questions come fast. Was the installation adequate. Was the property monitored. Did later damage come from the storm, or from a failed temporary measure. Good files answer those questions early.
Understand what the tarp is and what it is not
A professionally installed tarp can perform well for a limited period under the right conditions. It is still a temporary weather barrier, not a completed roof system. Exposure, roof pitch, fastening method, debris load, and drainage patterns all affect how long it remains dependable.
Watch the property after every meaningful weather event. Pay attention to changes that suggest the temporary seal is losing integrity:
- Lifted edges or corners
- Flapping fabric
- New interior staining or damp insulation
- Water ponding or debris buildup
- Movement around penetrations, ridges, valleys, or eaves
A small shift can turn into a larger opening quickly, especially on steep slopes or high-wind exposures.
Select the repair contractor carefully
The permanent repair phase decides whether the file stays organized or starts to drift. A contractor who understands insurance documentation will review the tarp photos, confirm what was exposed at the time of mitigation, and write a scope that matches observed damage. A contractor who skips that step can create disputes about causation, quantity, or whether hidden damage was preexisting.
Ask direct questions before authorizing work:
| Question to ask | Why it matters |
|---|---|
| Are you licensed where required and properly insured? | Reduces liability and gives the owner clear recourse |
| Will you provide a written scope with repair locations and materials? | Limits vague pricing and scope creep |
| Have you reviewed the mitigation photos and notes? | Connects the repair plan to documented storm conditions |
| How will concealed damage be handled once the tarp and damaged materials are removed? | Sets expectations for supplements and approvals |
| Who maintains temporary protection if scheduling slips? | Avoids gaps in responsibility |
On larger or more contested losses, that paper trail matters. Adjusters need a repair scope tied to the documented opening. Homeowners need to know who is responsible if conditions change before final repairs begin.
Know how mitigation costs fit into the claim
Emergency tarping is often considered part of reasonable mitigation when the underlying loss is covered. Reimbursement usually turns on proof that the work was necessary, prompt, and appropriate for the actual roof conditions.
Cost review should never happen in a vacuum. Access difficulty, slope, height, weather at time of service, size of opening, and fastening method all affect the invoice. A two-story roof with tree impact and active leakage is a different assignment than an accessible detached garage with a small puncture.
The file should support the charge. That means clear damage photos, installation photos, date and time records, crew notes, and an invoice that explains what was done instead of just listing "emergency tarp" as a lump sum.
A mitigation invoice gets approved more easily when the scope, site conditions, and photo record line up.
Watch demand spikes after catastrophe events
After a wide-area storm, response times often stretch. Crews get booked, materials tighten up, and even qualified contractors may have to prioritize by hazard level and access.
That changes decision-making on both sides of the claim. Adjusters should expect more urgency in authorizing temporary protection and more scrutiny on scheduling delays. Homeowners should not assume help will be available on short notice after the next rain band. In catastrophe conditions, waiting a few days can mean a much longer delay.
I have seen files turn on that point alone. The roof opening was manageable on day one. By the time service was finally available, the interior loss had spread and the documentation burden was much heavier.
Keep the file moving
Once the tarp is installed, the next steps are straightforward:
- Notify the carrier and upload the photo set promptly
- Schedule a permanent repair inspection
- Check interior ceilings, attic spaces, and contents after rain
- Save receipts, invoices, emails, and text approvals
- Request a reinspection if the tarp shifts or leakage returns
Discipline after tarping separates a clean mitigation file from a disputed one. The goal is simple. Keep the property stable, keep responsibility clear, and move the claim from emergency protection to permanent repair without losing the record of what happened.
Fox Claims Consultants LLC provides national field support for emergency tarping, steep and tall roof inspections, ladder assist, storm and tree damage assessments, and photo-documented reporting that helps carriers, adjusters, contractors, and homeowners move from immediate stabilization to a clearer claim path.
Leave a Reply